Exception Perceptions: Automate Your Workflow with Probot for GitHub Apps
On this episode of Exception Perceptions, GitHub Community Engineer Bex Warner stopped by to chat about Probot, a framework for automating GitHub. Watch the episode, and then read what else Bex has to say about the magic of Probot. Also, check out this example of what Sentry has built with Probot.
Probot can automate away all of those repeated task you take and make your software development workflow simpler, giving you time to focus on the things that are important to you.
How Probot Actually Works
Probot is a wrapper for GitHub Apps, the best way to build on top of GitHub. You may be familiar with Travis or Circle CI, or even the GitHub-Slack integration; all of these apps are built on top of GitHub — the Slack-GitHub integration is actually built with Probot!
GitHub Apps allow you to listen on webhooks: events that happen on GitHub (like opening an issue, or moving a project card), and then take action via GitHub’s REST and GraphQl APIs: through an authenticated Octokit client. GitHub Apps give you the ability to set granular permissions, so you know exactly what data you’re allowing the app to access.
The GitHub App authentication process involves downloading a private key from GitHub, using the key to encrypt a JSON Web Token, and using that JWT to request an installation access token. I don’t know about you, but that sounds super confusing to me. Never fear! Probot comes to the rescue by abstracting away the entire authentication process. All you have to do is specify what webhooks you want to listen on and what actions you want to take, and we handle the rest.
This all may still feel very abstract, so let’s see what a really simple example of a Probot app could look like. We’re gonna skip the set-up phase for this Probot app, but you can learn more about that here. For our example, let’s try adding a label needs-response to every new issue that gets opened.
Getting Started with Probot
Well the first thing we need to do is listen on webhook events. In this case, that event is a new issue being opened. In order to find this webhook event, I jumped to the GitHub Developer docs and found the issues event.
From here we can dive into the Probot code for this:
module.exports = app => {
app.on('issues.opened', async context => {
app.log(context)
})
}Here, app is an instance of Probot’s Application class. app.on takes a webhook and returns a context, which contains a payload with information about the webhook event and a github instance to make API calls.
From here, a label should be added every time this event happens. So we need to find out what information is needed to add a label. We can find this in the v3 REST docs under Add labels to an issue. We can see we need an owner, repo, number, and labels. Luckily for us, Probot’s internal APIs can help simplify this process. The context has an .issue() method which returns the corresponding owner, repo, and number of this issue for which the webhook event occured. Let’s log that out:
module.exports = app => {
  app.on('issues.opened', async context => {
    app.log(context.issue())
    // => {owner: 'username', repo: 'reponame', number: 123}
  })
}
Now that we know that, all we need to add is our labels array, and we can put needs-response in it, like so:
module.exports = app => {
  app.on('issues.opened', async context => {
    const params = context.issue({labels: ['needs-triage']})
    // params => {owner: 'username', repo: 'reponame', number: 123, labels: ['needs-triage']}
  })
}
Now all we need to do is use this information to make the API call. We can hop over to the Octokit docs to see what forming this API call looks like. The example from there is this:
const result = await octokit.issues.addLabels({owner, repo, number, labels})If you remember from before, the context contains .github which is an authenticated Octokit client, which matches octokit in this example. So we can pass our params into this call and make the API request:
module.exports = app => {
  app.on('issues.opened', async context => {
    const params = context.issue({labels: ['needs-response']})
    await context.github.issues.addLabels(params)
  })
}
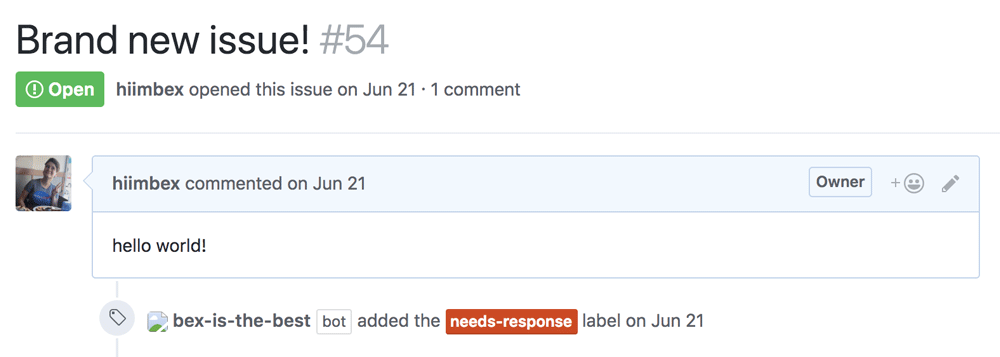
If you run this code, the result should look something like this:
🎉
Hopefully, this has helped you understand how Probot apps work a little better. For more inspiration for cool things you can do, check out other parts of our APIs. From here you can build your own Probot app, browse some of Probot’s existing apps, or join our slack community!
(Editor's note: You’ll also want to closely review our other episodes of Exception Perceptions — trust us on this one.)


