Customize Your Sentry Workflow: A Sample Internal Integration
This year we introduced the Sentry Integration Platform, which allows 3rd-party developers to build integrations that connect Sentry with their software. More recently we launched Internal Integrations, which lets developers combine Sentry with their internal tools to support their own custom workflows.
Internal integrations
Internal Integrations offer all the features of third-party integrations, but with a simpler authentication model. They are granted an access token that is scoped to your organization, without the need to use OAuth at all.
With this simpler authentication model, internal integrations are also great for creating quick prototypes to test out new workflow ideas that are unique to your team and your internal tools.
An Example Integration: Round Robin Issue Assignment
Let's walk through a small application that we built as an example that illustrates the custom workflows you can create with Sentry's Internal Integrations.
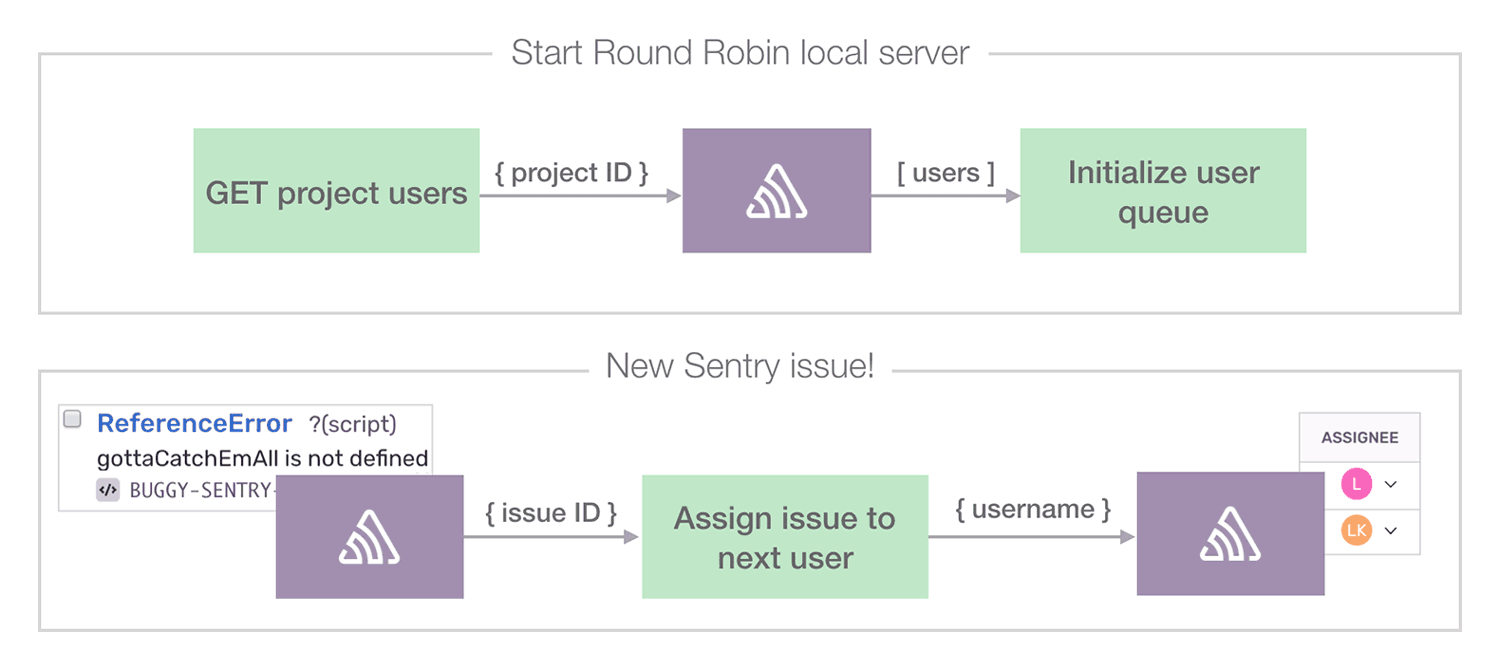
This example app cycles through team members on a given Sentry project, assigning each new issue to a different user until everyone has been assigned; the cycle repeats in the same order to evenly distribute issues across your team.
For the rest of this blog post, we're going to walk through the creation of this application to illustrate how easy it is to get started building integrations.
What we'll cover
Creating a new internal integration and assigning app permissions
Enabling and handling Sentry webhooks
Fetching a list of users with access to a given project with Sentry's Web API
Updating an issue's properties to assign a user with Sentry's Web API
If you want to try out the integration or take a look at all the code, you can find the Round Robin Integration on GitHub at getsentry/sentry-round-robin.
Creating a New Internal Integration
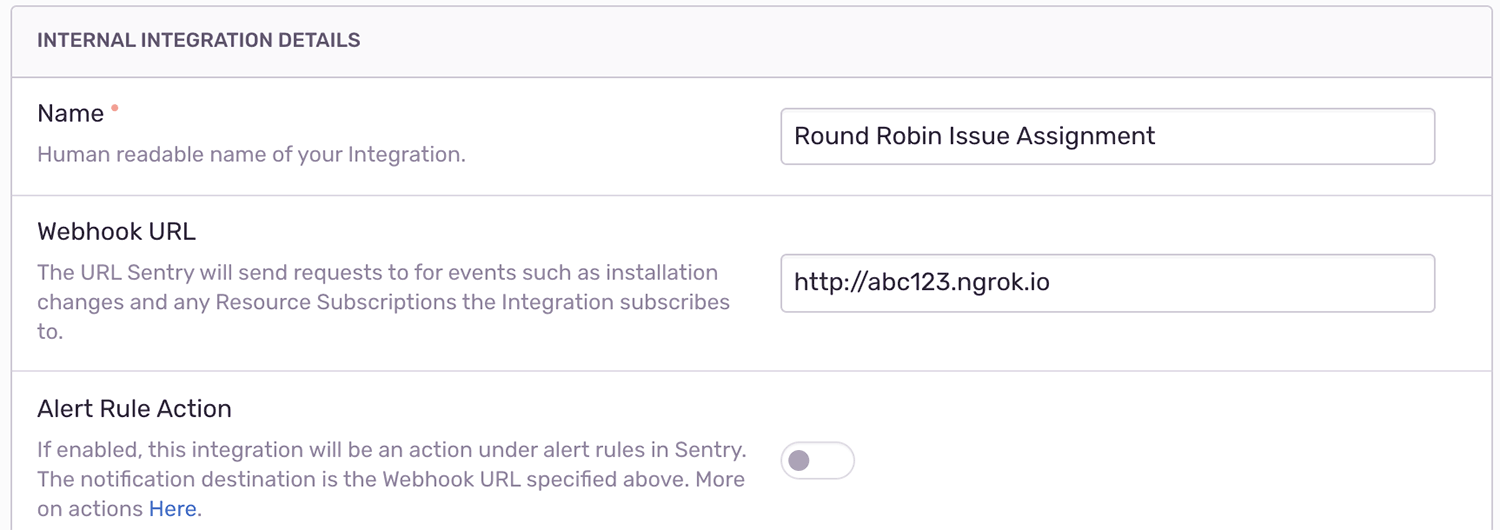
First, in the Sentry UI for your account, navigate to Settings > Developer Settings > New Internal Integration. There, you'll give your new integration a title (for example, Round Robin Issue Assignment) and configure it based on your needs.
The "Webhook URL" field should point to your server's endpoint for handling Sentry events (for example, when a new issue is created). In our case, we're testing out our Round Robin Integration with a local server using ngrok.
Object Permissions
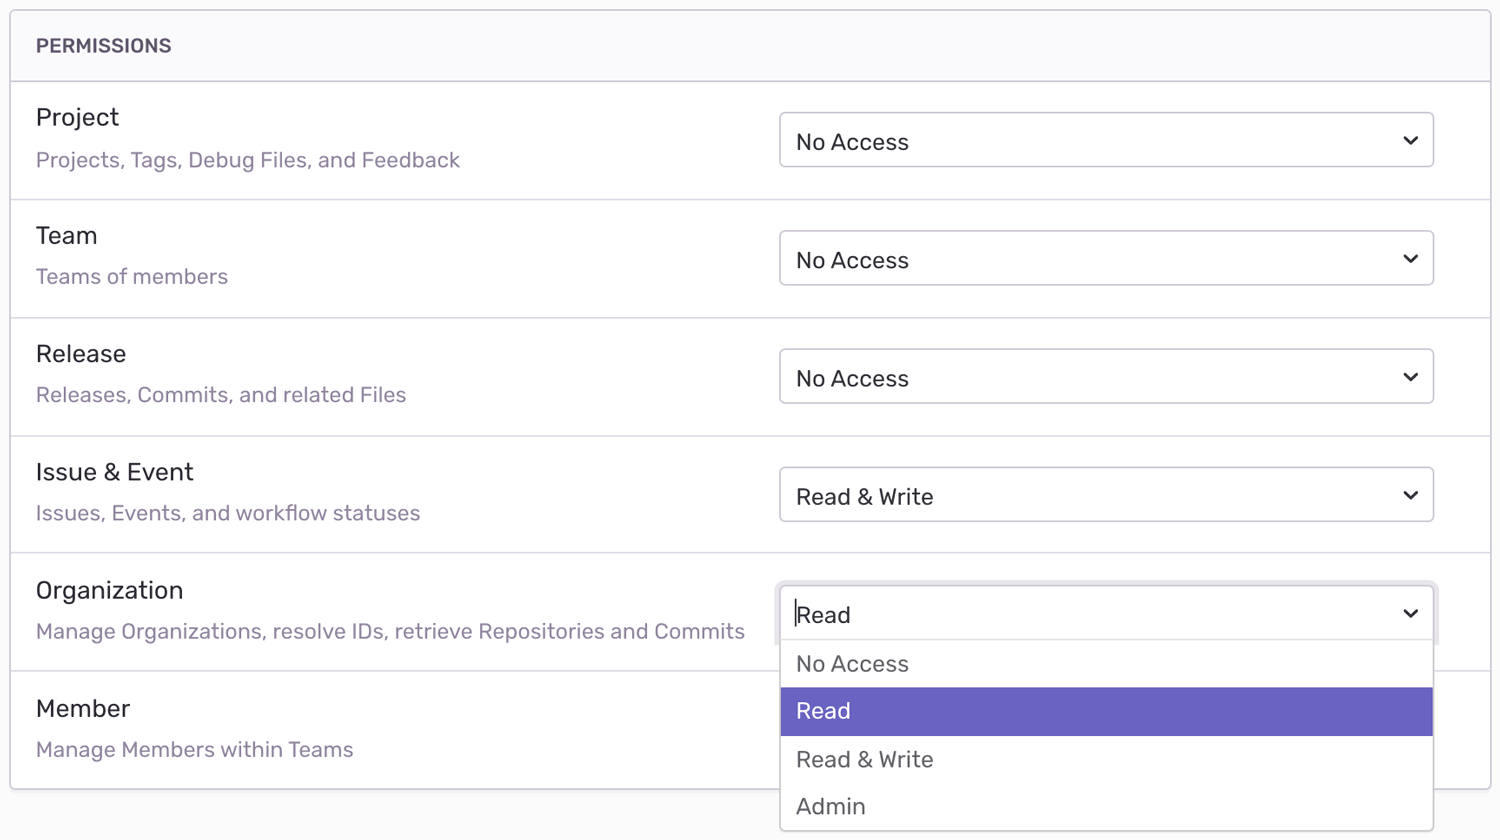
You can apply different sets of permissions for different integrations. For our Round Robin Integration, we'll need Read access to the "Organization" permission to retrieve our users and filter by project ID. We'll also use the Read & Write access to the "Issue & Event" permission so that we can update an issue, assigning it to the next user in the round robin cycle.
Webhooks
Webhooks allow you to receive requests from Sentry whenever certain events happen. For our Round Robin Integration, we'll check the box for "issue" under the "Webhooks" section to be notified when issued are created, resolved, assigned, or ignored.
After grabbing your access token and client secret from the bottom of the page, be sure to click "Save" and then throw those tokens into your integration's .env file.
Handling the issue-created webhook
We built the Round Robin Integration as a Node.js/Express app to handle webhook requests originating from the Sentry server.
When Sentry sends a request to our server:
We first verify that the request originated from the Sentry server.
We check if it's a newly-created issue. The request's
sentry-hook-resourceheader tells us if this request pertains to an issue, and theactionproperty of the JSON payload tells us if it wascreated,resolved,assigned, orignored.If it is indeed a newly-created issue, assign it to the next user in our queue.
This is captured in the following Express route:
app.post("/", async function(request, response) {
if (!verifySignature(request, process.env.SENTRY_API_SECRET)) {
return response.status(401).send('bad signature');
}
// Identify the type of request (in our case, new issues)
const resource = request.get("sentry-hook-resource");
const {action} = request.body;
// If a new issue was just created
if (resource === "issue" && action === "created") {
// Assign issue to the next user in the queue
const {id:issueID} = request.body.data.issue;
await assignNextUser(issueID);
}
response.status(200).send("ok");
});Fetching the project's users
Sentry's Web API lets you create releases, fetch events, upload artifacts, and do pretty much anything else your heart desires (well, only things related to Sentry).
In our round robin integration, upon initializing our server we'll send a GET request to the Organizations endpoint, so we can retrieve users in our organization who have access to a given project: /organizations/${orgSlug}/users/?project=${projectID}
Making our API requests is easy with the request-promise-native package:
// Return array of users for given project (or [])
async function getProjectUsers(projectID, orgSlug) {
  const requestOptions = {
    url: `${sentryAPIbase}/organizations/${orgSlug}/users/?project=${projectID}`,
    json: true,
    headers: { Authorization: "Bearer " + process.env.SENTRY_TOKEN }
  };

	let result = await sendRequest(requestOptions);
  return result.map(userData => userData.user.username);
}
For now, our integration only works for one hard-coded project at a time, configured in the .env file.
Assigning a new issue to a user
To assign each new issue to the next user in the round robin cycle, we send a PUT request to the /issues/${issueID}/ endpoint to update the issue, including the JSON payload "{ assignedTo: ${username} }". Here's the code:
// Assign issue to a given user
async function assignIssue(issueID, username) {
  const requestOptions = {
    url: `${sentryAPIbase}/issues/${issueID}/`,
    method: "PUT",
    json: true,
    headers: { Authorization: "Bearer " + process.env.SENTRY_TOKEN },
    body: { assignedTo: username }
  };

  return await sendRequest(requestOptions);
}
And voila! With one webhook, two API requests, and a sprinkle of logic, we now have a custom workflow that lets us automatically assign issues to our teammates, round-robin style.
If you want to try out the integration or take a look at all the code, you can find the Round Robin Integration on GitHub at getsentry/sentry-round-robin.
Internal Integration All the Things!
Of course, this was just one tiny example amongst limitless possibilities for fine-tuning your team's workflow and combining Sentry with other tools.
Our custom UI components are another feature to explore from our Integration Platform, also available to internal integrations. Here are a couple examples:
Clubhouse uses Sentry's "linked issues" UI component to create Clubhouse Stories within the Sentry Issues UI.
Rookout uses our "stack trace" UI component to let users jump directly from a Sentry issue's stack trace to the same line of code inside Rookout at the click of a button.
Let us know how your own team is using our Integration Platform; we'd love to hear about not only your public Sentry integrations, but also your team's internal workflow innovations!


