Performance testing is an important part of any application. It helps developers to increase the application reliability while providing a smooth user experience to the end users. However, when it comes to Unity projects, games and interactive applications have a higher requirement for performance compared to traditional applications.
So, in this article, I will discuss the importance of Unity performance testing and walk you through the steps of creating a performance test case using a real-world project example.
Why do you need performance testing in Unity?
Let’s consider an example to understand the importance of performance testing in Unity.
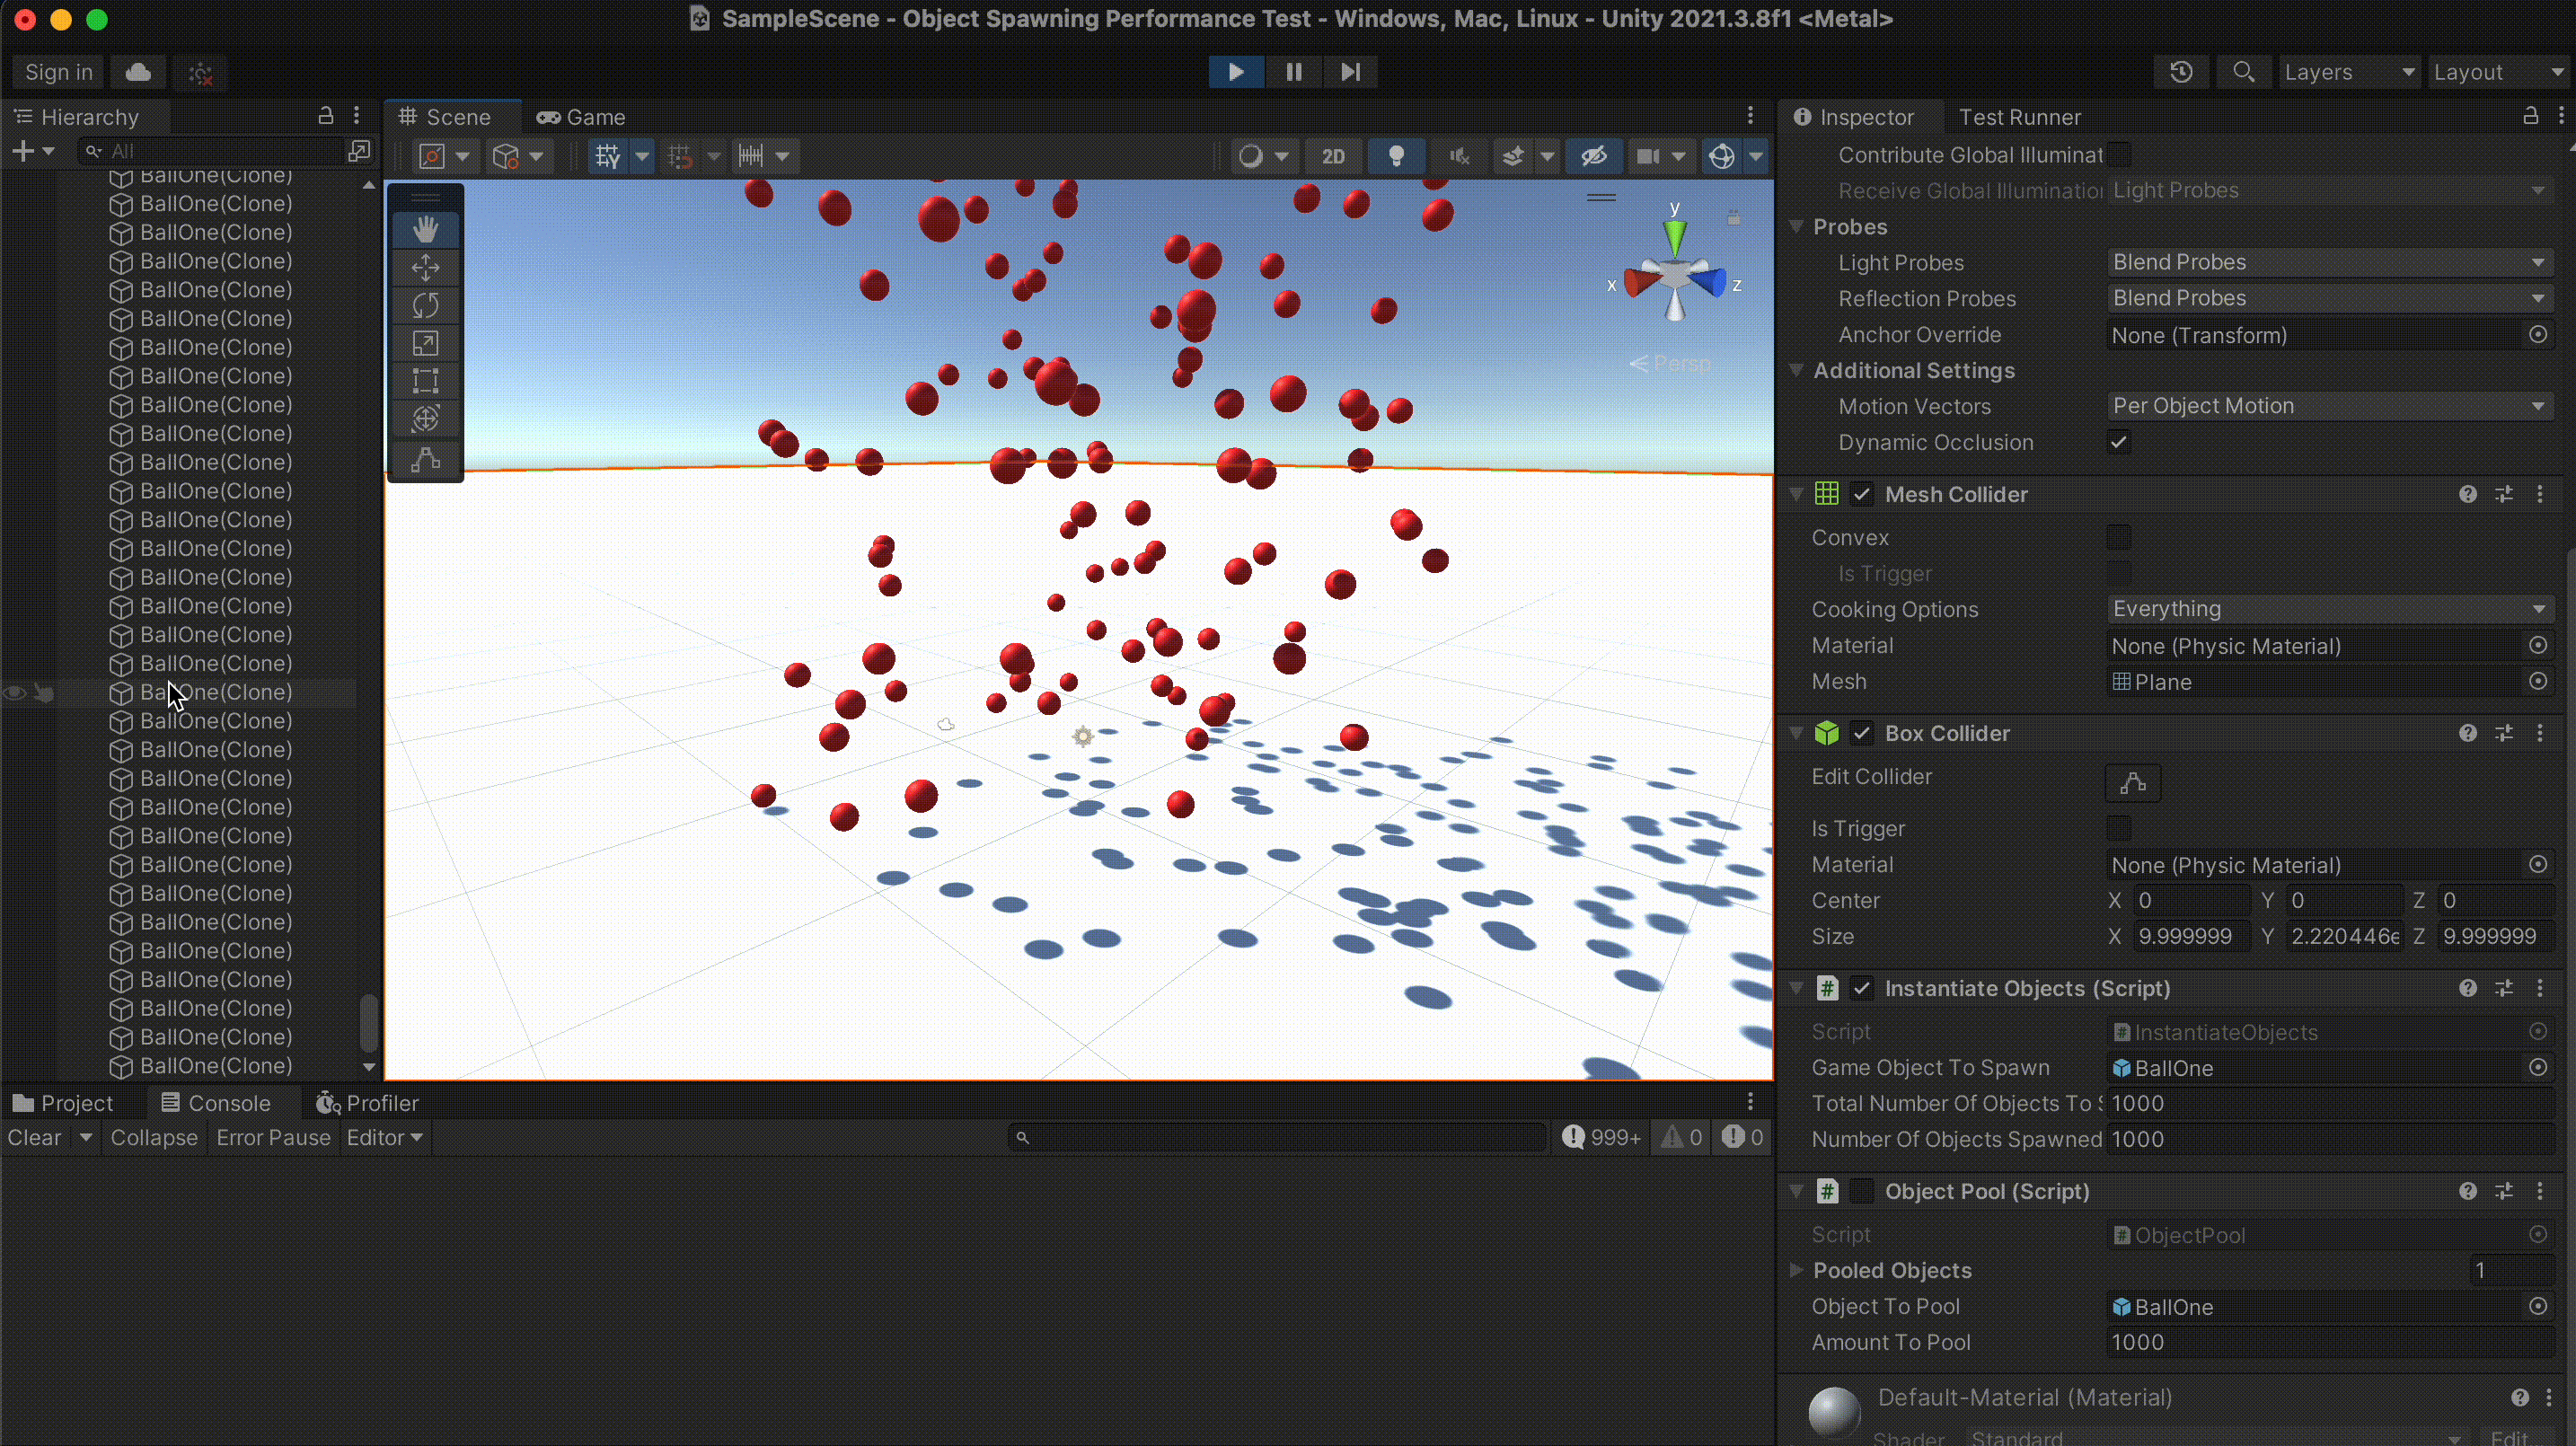
Suppose you are developing a game in Unity that randomly spawns 1,000 red color balls as prefabs during the gameplay. The below screenshot shows how it is going to look like after your development.
To achieve this behaviour, first, you may need to use the Instantiate() method to create clones of the prefab in random positions. Below is an example code snippet using the Instantiate() method for this intended functionality.
But there is an issue. The above method spawns only one object in a random position, but you need 1,000 game objects to appear in the scene.
To achieve that, all you need to do is to call the above SpawnObject() method inside a loop, as shown below. In that case, you can clone any number of game objects during the runtime. In your scenario, you can assign 1,000 to the totalNumberOfObjectsToSpawn variable.
After that, you can assign game object prefab as you wish from the inspector panel and run your project. In that case, you will see an output as you expected at the beginning.
Even though you achieved your desired output, since we are dealing with a massive number of game objects, it is impossible to count the number of game objects in the scene manually. So then, how do you ensure your script spawns the number of objects you intend to spawn? That’s where testing comes into play. For example, you can design a unit test for the above scenarios to ensure that number of spawned objects is similar to the number of objects you intend to spawn.
However, you can’t unit test to guarantee whether the objects were spawned within the expected time duration. Similarly, it does not give any information on the resource usage of the spawning process. For that, you need to create a performance test, which will provide you with all the details related to resource usage, timing, etc. Then, you can use that information to fine-tune your application.
So, let’s start things by creating a simple unit test for the above-discussed scenario.
Unit test case to count the number of spawned game objects
The Unity Test Framework is ideal for cross-platform tests and supports Android, iOS, and standalone applications. This framework is embedded in the Unity editor. So you do not need to install additional packages from outside.
To open Unity Test Runner, go to Window ->General ->Test Runner.
Once the test runner window is opened, you can click on the “EditMode” tab, which allows you to run test cases without running the game. Next, click the “Create EditMode Test Assembly Folder” button. You will see a new folder is getting created in your project panel.
You can rename it as you prefer. Inside that folder, you can see an assembly definition file.
Next, click the “Create Test Script in current folder” button, which will be enabled soon after creating the “EditorTests” folder. You will get a default test script next to the assembly definition file. For this example, I’ll rename it as “GameObjectCountTest.”
So far, we have created the infrastructure for Unit testing, and now we can create a simple unit test case to check whether we are spawning the number of game objects less than the maximum number of game objects we allow for spawning in the scene.
The example test case below checks the number of game objects getting spawned and passes the test if the generated number of game objects is less than the expected number.
using NUnit.Framework;using UnityEngine;public class GameObjectCountTest{ [Test] public void SpawnAllObjects_SpawnsExpectedAmountOfObjects() { var gameObject = new GameObject(); var _script = gameObject.AddComponent<InstantiateObjects>(); _script.SpawnGameObjects(); Assert.That(_script.numberOfObjectsSpawned, Is.LessThan(1000));}
To run this test case, you can go to the Test Runner window and click on the “Run All” button.
As you can see, it works as expected. However, suppose one of the other project’s developers changes this code to spawn more than 1,000 game objects. Your test cases will probably identify this change, and the test will fail. So you can look into your code and quickly determine what has changed. This is exactly the fundamental objective of writing unit tests. But unit tests are not the only assurance for your Unity project’s smooth and reliable execution.
Even though unit testing greatly helps you to identify possible defects and changes in your code, you can’t find the performance impact of your code. For example, spawning 10,000 game objects might be logically okay, and you may allow it to happen. But how do you ensure the performance impact of it? Unfortunately, your unit tests cannot give any insight into that aspect.
To evaluate the performance of a Unity application, you can use “Unity Profiler.”
How to run performance testing in Unity
Unity provides another tool called “Unity Profiler”, which is mostly an underrated utility among many developers. You can use it to derive performance metrics of a Unity application, including frame rate, memory usage, rendering statistics, and many more.
You can open Unity Profiler through Window -> Analysis -> Profiler menu.
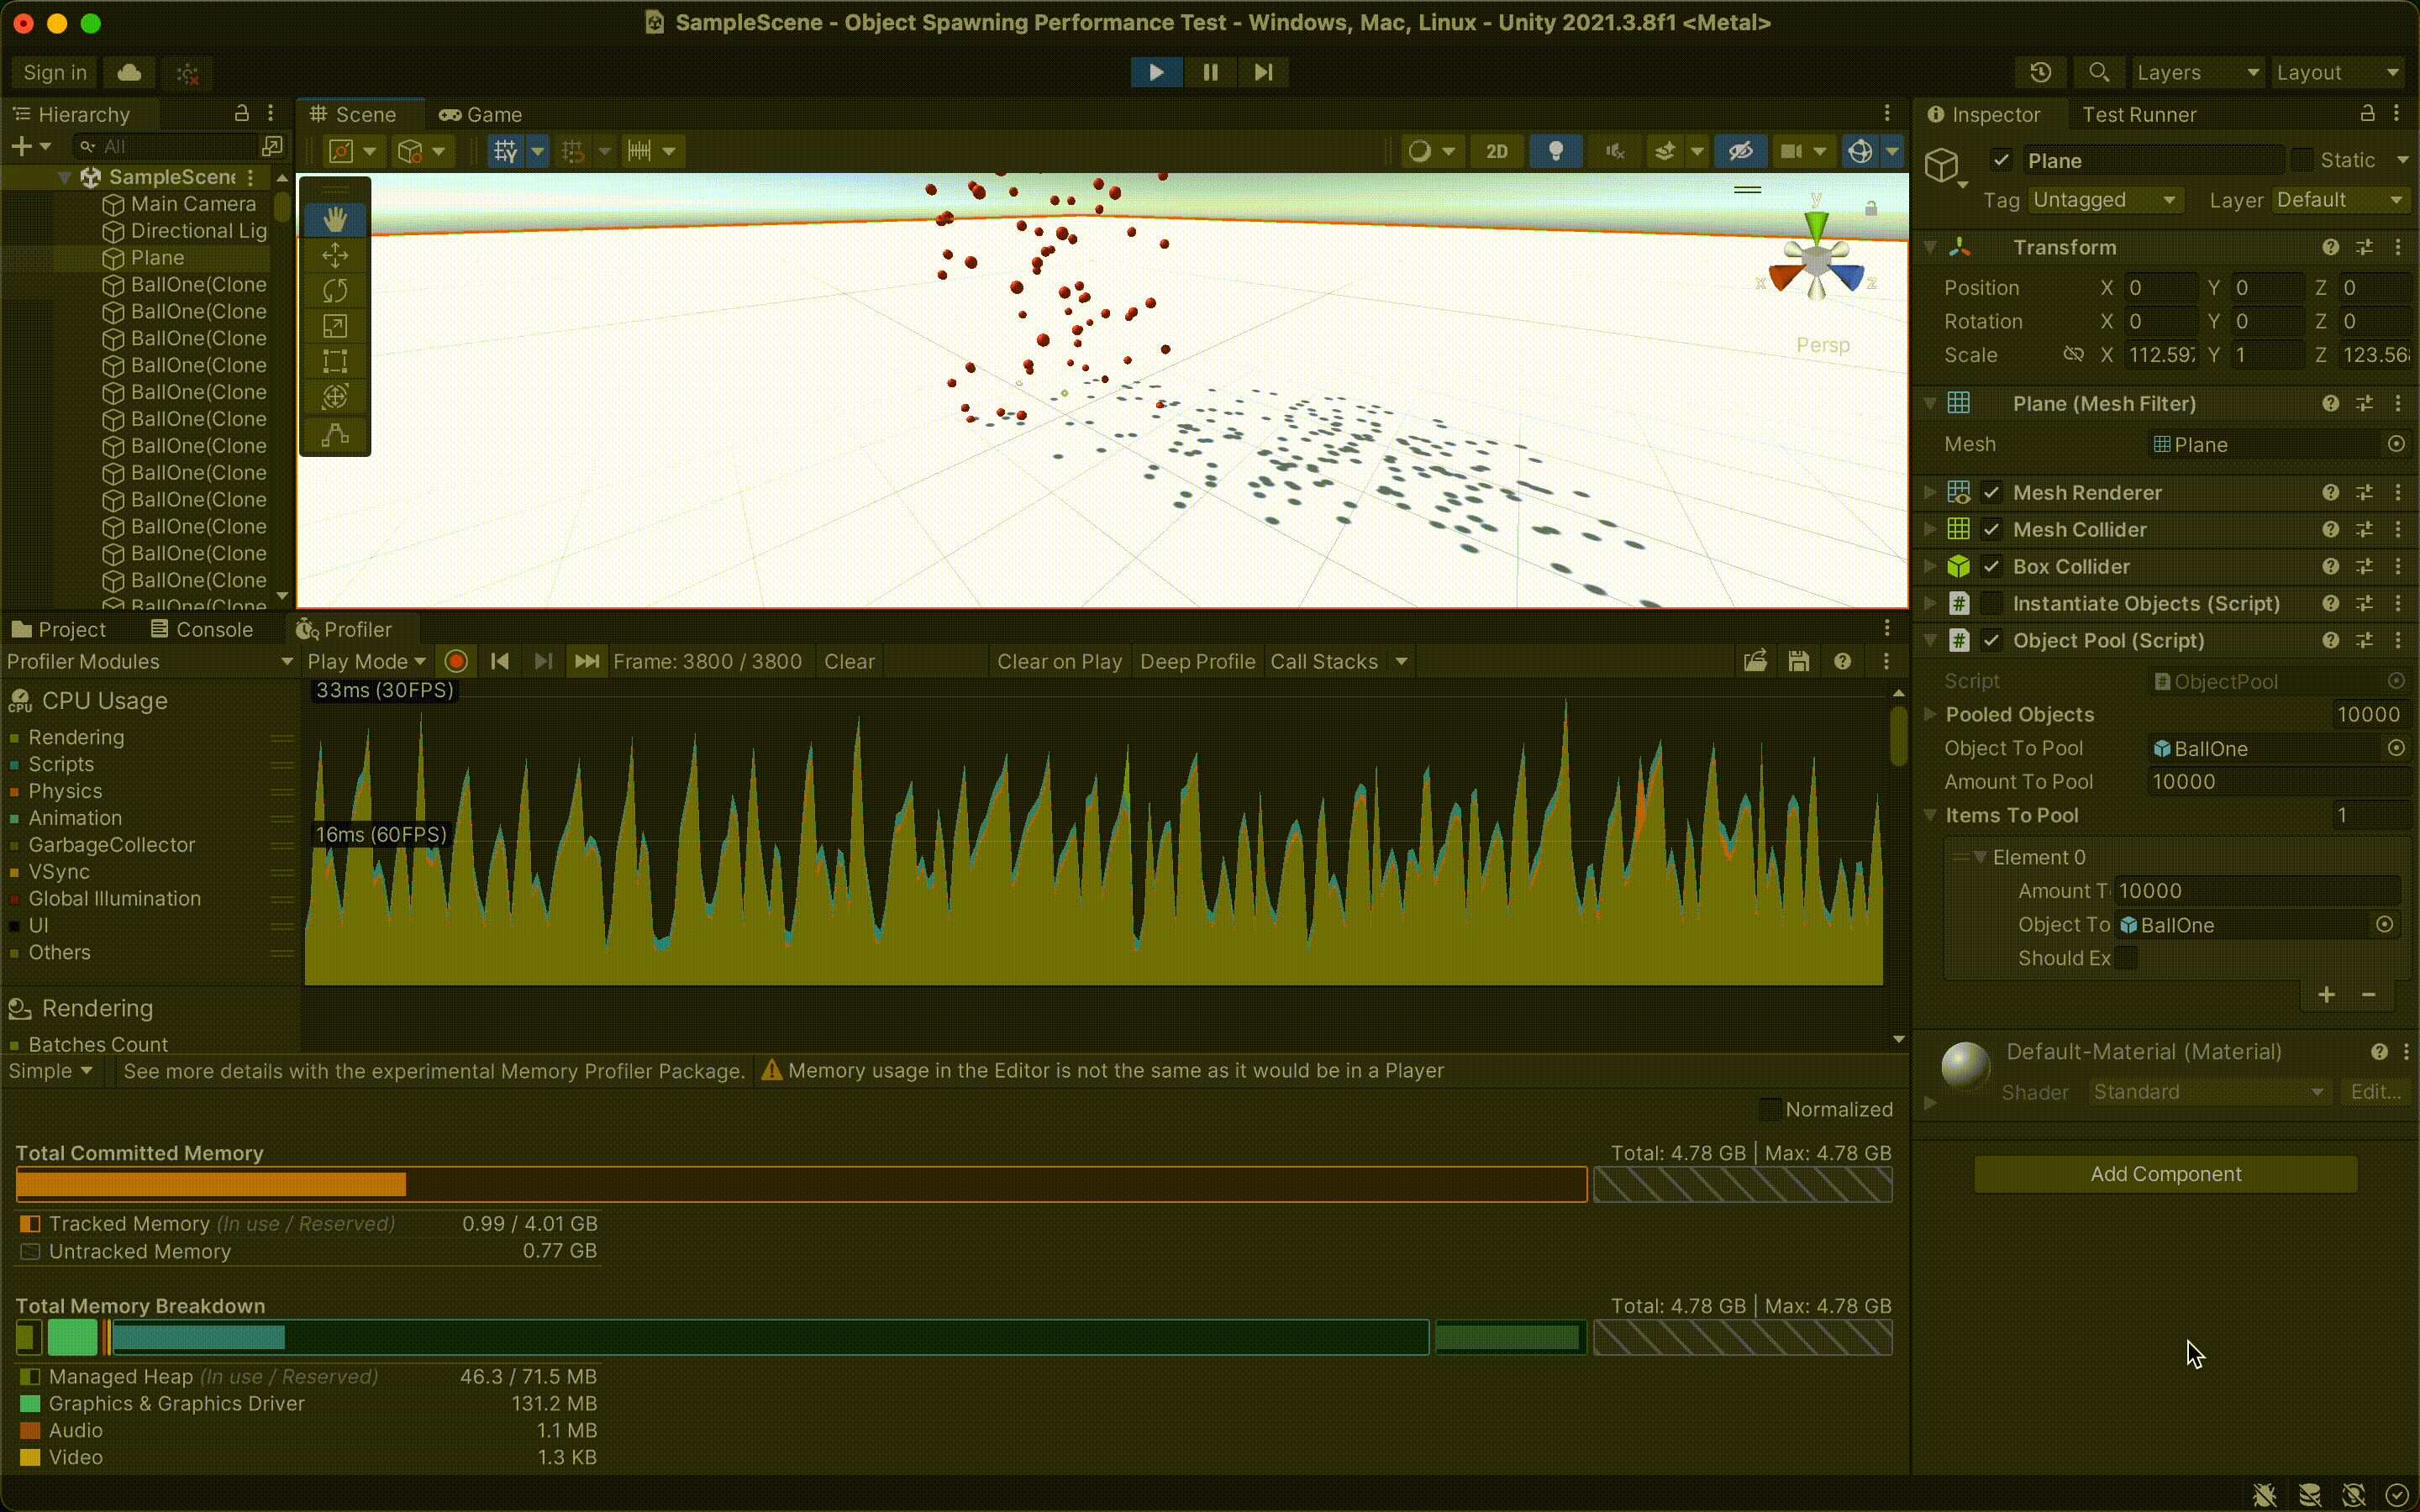
Using this tool, you can see the performance metrics during the runtime. Below is the comparison of CPU usage of spawning 1,000 game objects vs 1,0000 game objects using Unity Profiler.
According to the above comparison, the delay occurs due to heavy CPU usage of around 16 milliseconds for 1,000 game objects; meanwhile, spawning up to 10,000 game objects may cause delays above 33 milliseconds.
So just spawning those 1000 objects is already taking as long as the whole update loop is supposed to take. Furthermore, having to spend 33ms to spawn 10,000 game objects is an absolute disaster. Such CPU usage negatively impacts performance, such as your game’s frames per second (FPS), especially if your application runs on mobile devices or low-performance computers.
As you can see, performance test results provide vital information on your applications. You can use this information to optimize your code and prevent performance issues even before they happen.
Using performance test findings to optimize code
Based on the above performance test results, it is evident that spawning 10,000 objects are more costly than 1,000 objects. Now we know that our Unity application is CPU intensive. Therefore, it might be good to look into optimising the code to make the execution smoother for the end user.
You can introduce several tweaks to lower the resource demand of this application. Instead of calling the Instantiate() method, one approach uses the object pooling technique as a fix to get around this bottleneck.
The object pooling concept can improve performance if a project intends to repeatedly create and terminate the same game object within a short period. This technique initially creates all game objects the application needs and sets them as inactive objects. We call this group of objects an “Object Pool.” Then, whenever you need to have a clone of your desired game object, you do not need to instantiate new game objects. Instead, you can activate a game object from the object pool. This approach reduces the CPU load because we recycle game objects instead of creating new game objects every time we need them.
The below code snippet shows the modified code of our object spawning project with the object pooling technique.
void Start() { pooledObjects = new List<GameObject>(); for (int i = 0; i < amountToPool; i++) { GameObject initialGameObjectToPool =(GameObject)Instantiate(objectToPool); initialGameObjectToPool.SetActive(false); pooledObjects.Add(initialGameObjectToPool); }}private void OnCollisionEnter(Collision collision){ if (gameObject.tag == "Enemy") { gameObject.SetActive(false); }}public void SpawnObject(Vector3 randomSpawnPosition) { GameObject exsistingGameObjectFromPool = ObjectPool.SharedInstance.GetPooledObject("Enemy"); if (exsistingGameObjectFromPool != null) { exsistingGameObjectFromPool.transform.position = randomSpawnPosition; exsistingGameObjectFromPool.SetActive(true); }}public GameObject GetPooledObject(string tag) { for (int i = 0; i < pooledObjects.Count; i++) { if (pooledObjects[i] != null && !pooledObjects[i].activeInHierarchy && pooledObjects[i].tag == tag) { return pooledObjects[i]; } } return null;}
After applying this new approach, the performance results for spawning up to 10,000 game objects show significantly lower resource usage.
You can find the entire Unity project discussed in this article here.
Summary
This article discussed the importance of Unity performance testing through a real-world example and how straightforward it is to conduct performance testing using the Unity Profiler. However, the Unity Profiler might not be enough if you work with high-performance games or Unity applications. In that case, you can use more advanced 3rd party performance testing tools like Sentry.
I hope this article will help you build and ship high-quality Unity applications for your users.
After 1.6 million downloads, the Usage app team shares how they use Sentry's crash monitoring, error tracking, size analysis, and user feedback to stay ahead of Apple platform changes.
Picking a model for your agent is a tradeoff between cost, quality, and speed. Here's a free-tier model that made things up, what an eval would and wouldn't have caught, and why reading the agent traces is how you actually decide.