Monitoring Django Application Performance Errors with Sentry


Anesu M. -

Sentry is an application performance monitoring platform that allows developers to track errors and performance data.
In this tutorial, we’ll show you how to add Sentry to a Django application so that you can track and resolve any errors or performance issues that occur while your application is in production.
Prerequisites
You will need the following in order to follow along with the tutorial:
An account with Sentry
Python 3.4+ development environment
pgAdmin4 and PostgreSQL
Getting Started
Create a Sentry account by navigating to the signup page and filling in your details or signing up with your Google or GitHub account.

When you've successfully created your account, you will be redirected to the "Welcome" page which is shown in the image below.
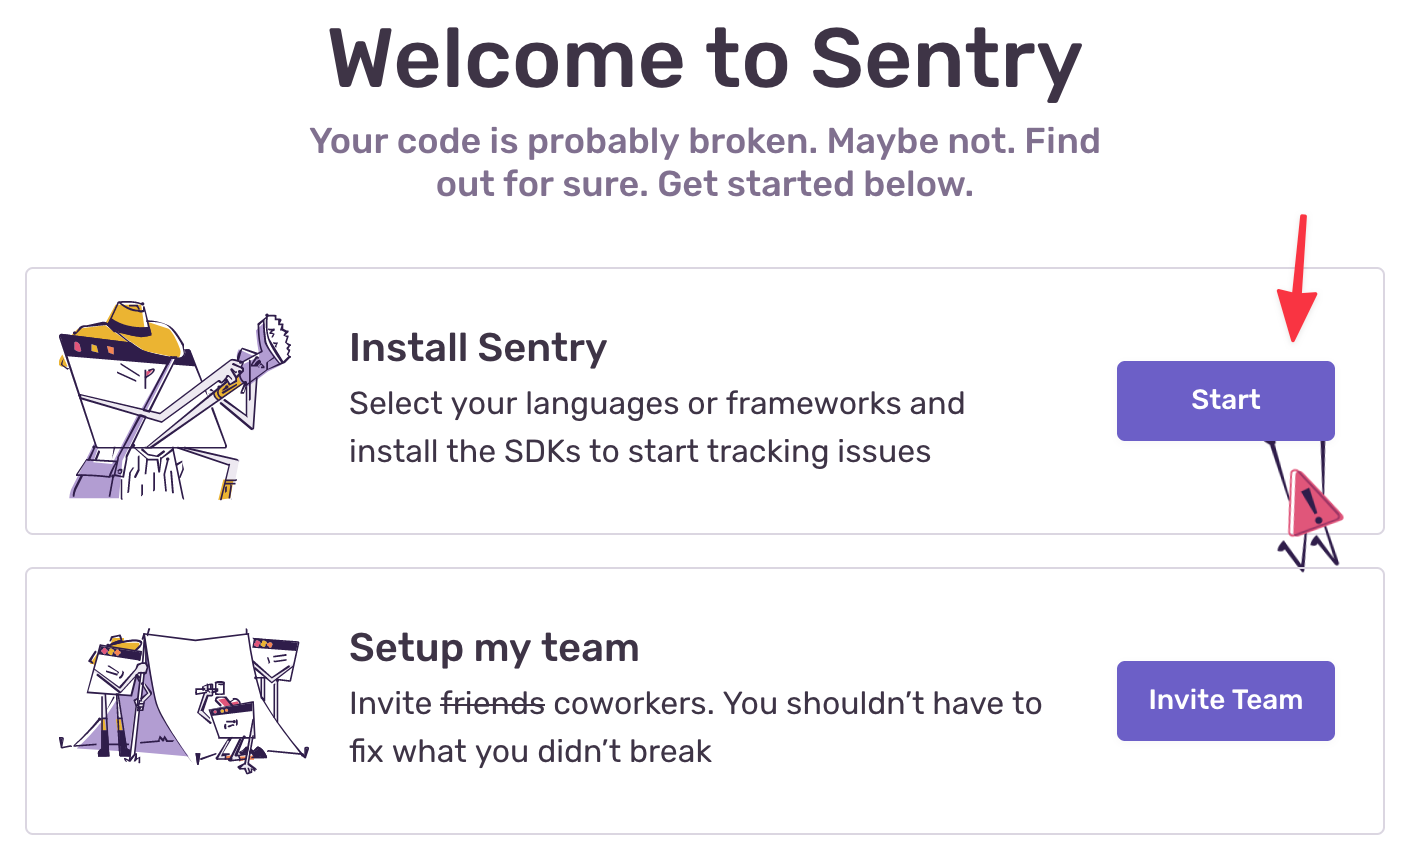
Click on the "Start" button, after which you will be taken to the "Select Platform" page. Select Django and click on the "Create Project" button.
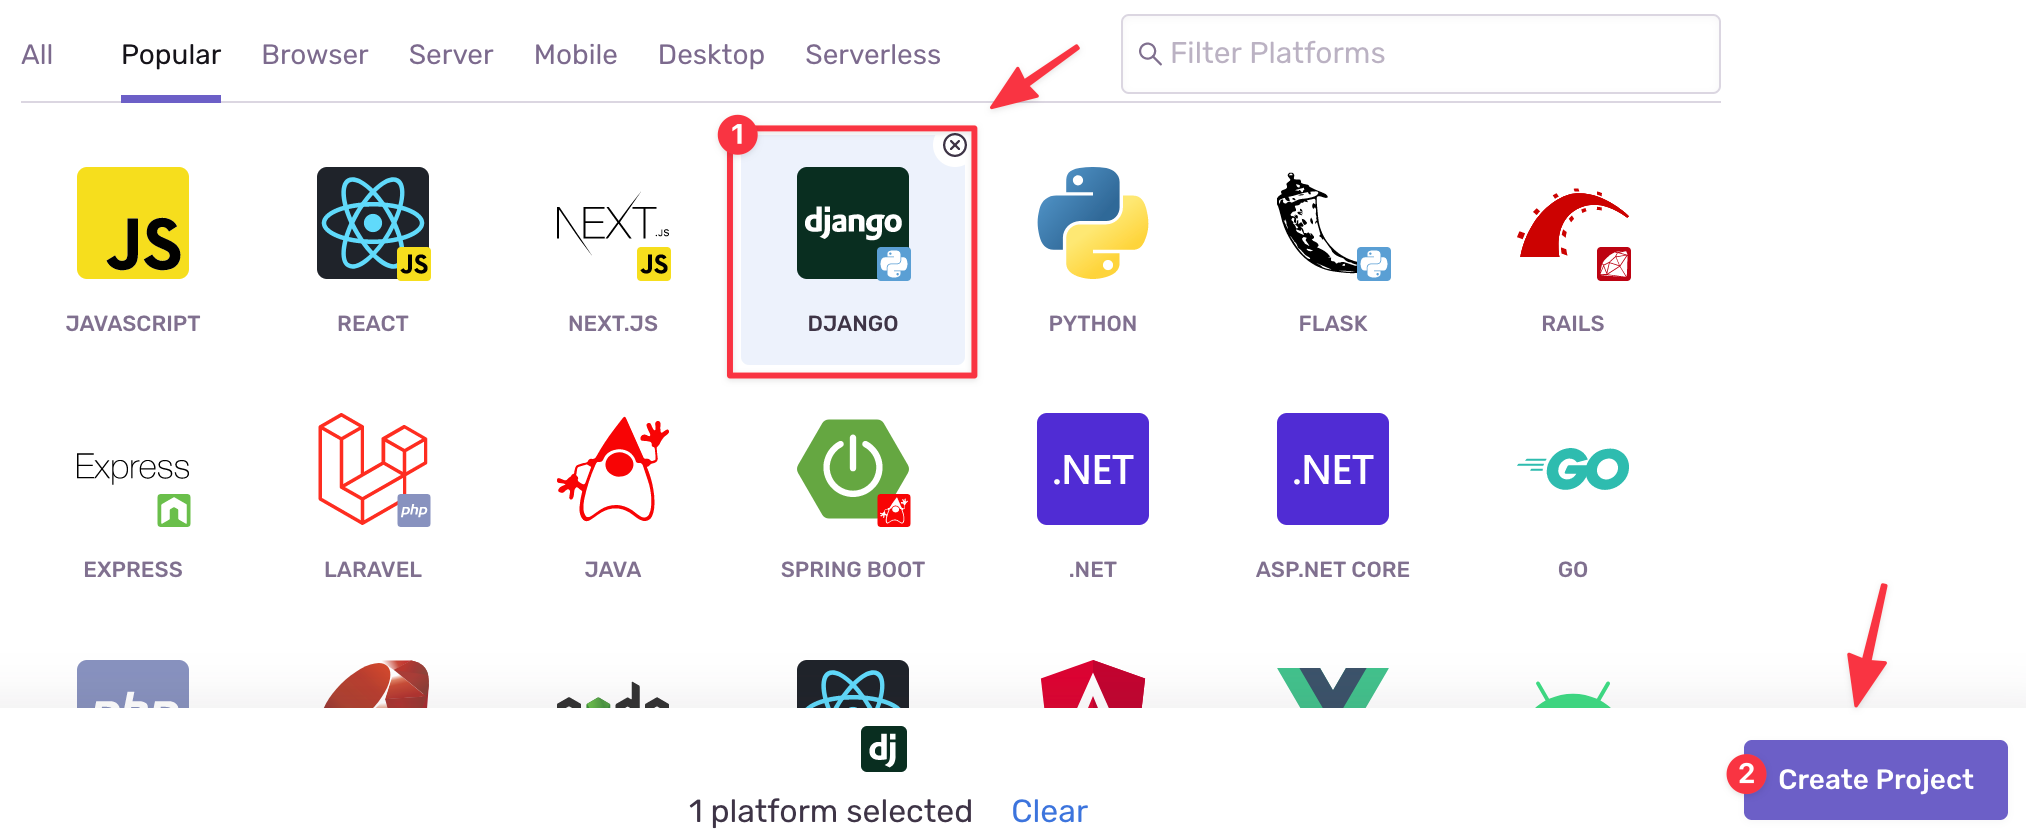
Next, you will be taken to a page with instructions on how to prepare the Sentry Django SDK for it to work with your application.
Project Set Up
In this step we'll prepare the development environment we’ll be working in and install the required packages.
Create a Virtual Environment
A virtual environment allows us to isolate packages for different applications. We’ll create a virtual environment for our Django application so we can define only the packages needed for it to run.
Run the command below in a terminal while in your preferred working directory to create the virtual environment:
python3 -m venv djangoenvTo activate the environment, run one of the following commands depending on your OS.
MacOS/Linux
source djangoenv/bin/activateWindows
.\djangoenv\Scripts\activateInstall Packages
We can now add packages to our virtual environment.
Run the commands below to install the packages we need:
pip3 install django djangorestframework
pip3 install --upgrade sentry-sdk
Create a Django Project
A Django project can be thought of as a container for different applications that will be working together within it in order to bring about the project’s overall desired functionality. Create a boilerplate Django project by running the command:
django-admin startproject sentrydjangoCreate and Set Up an Application
In this step we’ll extend the starter project by adding an application to it so as to give it meaningful functionality.
Navigate into the project’s root folder by running cd sentrydjango. From here, we can initialize our application by running:
python3 manage.py startapp namesThis command creates a names directory that will house our application’s src code.
Now we'll add the names application to our project by adding it to the INSTALLED_APPS list in the sentrydjango/settings.py file, like so:
INSTALLED_APPS = (
   'names.apps.NamesConfig',
   'rest_framework',
    ...,
    ...,
)
Take care to add the “names.apps.NamesConfig” entry as the first item in the list. We also need to register the djangorestframework package we installed earlier using the string, rest_framework.
Register Application Models and Serializers
Open the models.py file in the "names" directory and add the code below to define a Person model:
from django.db import models

class Person(models.Model):
   name = models.CharField(max_length=200)
We're giving the model only a name field to keep things simple and ensure the tutorial is easy to follow.
Now we'll add a Person serializer to handle validating and translating data from JSON into a format that can be saved in the database and vice versa when we perform read operations. Create a names/serializers.py file and add the code below to it:
from rest_framework import serializers
from .models import Person

class PersonSerializer(serializers.ModelSerializer):
   name = serializers.CharField(max_length=200)

   class Meta:
       model = Person
       fields = ('__all__') # all fields required
Create Application Views
Let's add views to perform the different HTTP methods on our dataset. Open the names/views.py file and add the following code to it to define routes for posting and getting data from the database:
from django.shortcuts import render
from django.http import request
from rest_framework.views import APIView
from .serializers import PersonSerializer
from .models import Person

def index(request):
   return render(request, "index.html")

class PersonAPIViews(APIView):
   def post(self, request):
       serializer = PersonSerializer(data=request.data)
       #check if data is valid then save else return error
       if serializer.is_valid():
           serializer.save()
           return render(request, "index.html", context={"message": "Save Successful"})
       else:
           return render(request, "index.html", context={"message": "Save Not Successful"})

   def get(self, request, id=None):
       #fetch all persons
       persons = Person.objects.all()
       serializer = PersonSerializer(persons, many=True)
       return render(request, "names-list.html", context={"persons": serializer.data}
)
You’ll notice the serializer we defined earlier is used to validate POST data before we save it. When it’s a GET request, the serializer is used to convert database models into JSON data that can be easily sent to the frontend.
We use class-based views by inheriting from Django REST framework’s APIView class. In the event of a POST request the post method is called and for a GET request the get method is called. When we’re done modifying the backend we’ll look at how to add the frontend templates referenced in the above views.
Add Application URLs
We can now add the application URLs. Create a urls.py file inside the names directory and populate it with the code below:
from django.urls import path
from .views import PersonAPIViews
from .import views

urlpatterns = [
   path('', views.index, name='index'),
   path('names', PersonAPIViews.as_view()),
]
Let's add our application's URLs to the Django project. Open sentrydjango/urls.py and replace its content with the following code:
from django.contrib import admin
from django.urls import path, include

urlpatterns = [
   path('admin/', admin.site.urls),
   path('app/', include('names.urls')),
]
The "names" application index route (def index(request) in views.py) will be available at localhost:8000/app/ since we added the application’s routes under the app/ route.
Add PostgreSQL Database
Our application’s backend is now only short of a database. Let’s add a PostgreSQL database to enable persistent storage. Open pgAdmin4 and create a new database called "dbtest".
Next, open the sentrydjango/settings.py file and modify the DATABASES section with the code below:
DATABASES = {
   'default': {
       'ENGINE': 'django.db.backends.postgresql_psycopg2',
       'NAME': 'dbtest',
       'USER': 'postgres',
       'PASSWORD': '<YOUR VALUE HERE>',
       'HOST': '127.0.0.1',
       'PORT': '5432',
   }
}
Take care to replace the PASSWORD value with your own.
Run Database Migrations
Now we can tell our database which tables our application needs in order to work by running the relevant migrations. Migrations translate the models defined in our application into their respective tables in the database.
While in the project’s root folder, run the command:
python3 manage.py makemigrations namesThis command will generate the SQL statements that need to be run against the database in order to create the tables for the "names" application.
Next, run the command:
python3 manage.py migrateThis command executes the SQL statements generated by the previous command.
Add Application Frontend
With the application’s backend now complete, we can focus on the frontend. We’ll need two templates, one for adding names and one for reading a list of all submitted names. Create a names/templates directory to house our application’s frontend templates. Inside the templates directory, create a file named index.html and populate it with the code below:
<!DOCTYPE html>
<html lang="en">
<head>
   <title>Names App</title>
   <link href="https://cdn.jsdelivr.net/npm/bootstrap@5.0.0-beta1/dist/css/bootstrap.min.css" rel="stylesheet"
       integrity="sha384-giJF6kkoqNQ00vy+HMDP7azOuL0xtbfIcaT9wjKHr8RbDVddVHyTfAAsrekwKmP1" crossorigin="anonymous">
   <style>
       body{
           padding: 20px;
       }
   </style>
</head>

<body>
   # Submit Your Name
   {% if message %}
       ### [[WIDGET_PLACEHOLDER_message]]
   {% endif %}

   <form action="/app/names" method="post" class="mb-3">
       <input type="text" placeholder="Name" name="name" class="form-control mb-3" />
       <button type="submit" class="btn btn-primary">Submit</button>
   </form>
   [View Submitted Names](/app/names)
</body>
</html>
Here, we are creating a form which handles the submission of new names by sending the POST data to the /names route. The <head> tag includes a link to Bootstrap to make use of Bootstrap’s styling library.
Now create a names-list.html file inside the templates folder. The purpose of this file will be to display the list of names that have been submitted by our application's users. Add the following code to the names-list.html file:
<!DOCTYPE html>
<html lang="en">
<head>
   <title>Names App</title>
   <link href="https://cdn.jsdelivr.net/npm/bootstrap@5.0.0-beta1/dist/css/bootstrap.min.css" rel="stylesheet"
       integrity="sha384-giJF6kkoqNQ00vy+HMDP7azOuL0xtbfIcaT9wjKHr8RbDVddVHyTfAAsrekwKmP1" crossorigin="anonymous">
   <style>
       body{
           padding: 20px;
       }
   </style>
</head>

<body>
   # Submitted Names
   <ul>
   {%for person in persons%}
       <li>{{ person.name }}</li>
   {%endfor%}
   </ul>
    [Go To Home](/app/)
</body>
</html>
The for loop on the page loops through the list of names that have been supplied by the GET request.
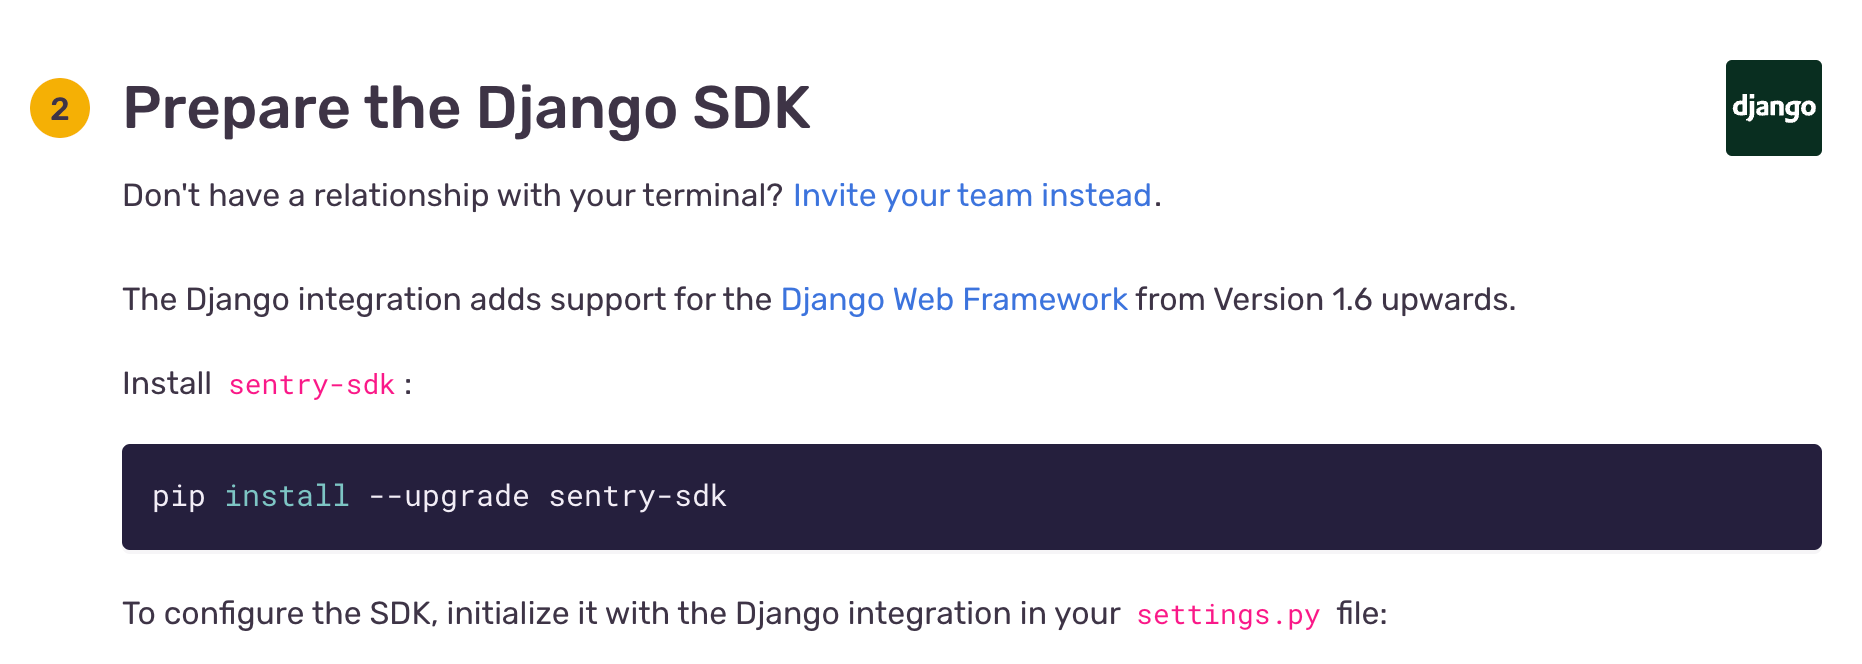
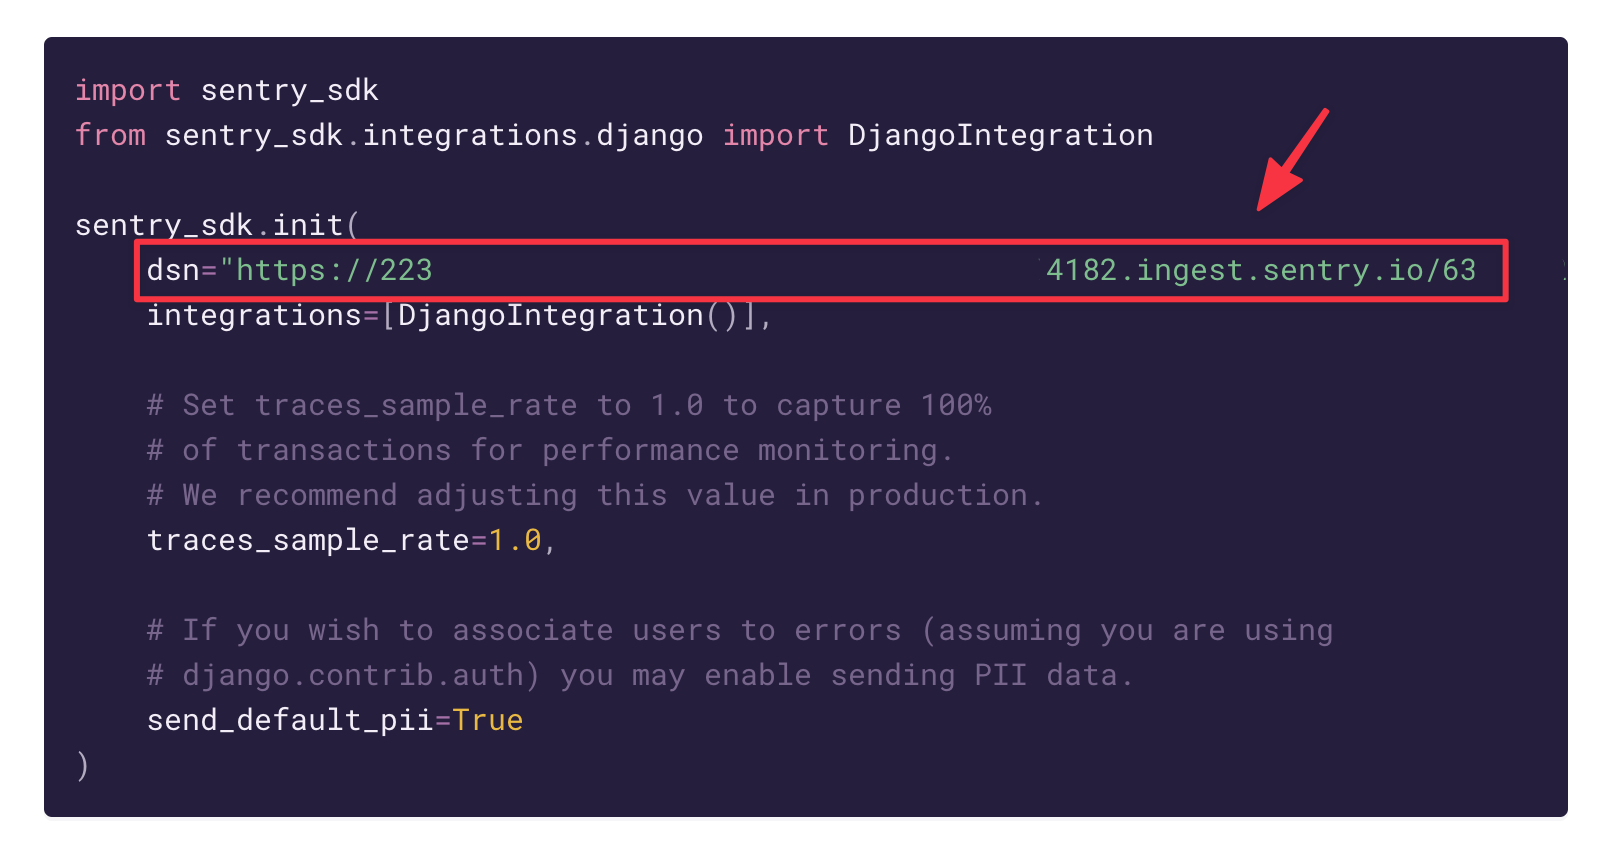
Add Sentry to Django Application
Let’s add Sentry to our Django application to see it in action. Open the sentrydjango/settings.py file and add the code below to initialize the Sentry Django SDK on project startup:
import sentry_sdk
from sentry_sdk.integrations.django import DjangoIntegration

sentry_sdk.init(
   dsn="<YOUR VALUE HERE>",
   integrations=[DjangoIntegration()],

   # Set traces_sample_rate to 1.0 to capture 100%
   # of transactions for performance monitoring.
   # We recommend adjusting this value in production,
   traces_sample_rate=1.0,

   # If you wish to associate users to errors (assuming you are using
   # django.contrib.auth) you may enable sending PII data.
   send_default_pii=True,

   # By default the SDK will try to use the SENTRY_RELEASE
   # environment variable, or infer a git commit
   # SHA as release, however you may want to set
   # something more human-readable.
   # release="myapp@1.0.0",
)
Take care to replace the dsn value with your own. Find your dsn value on Sentry’s "Prepare the Django SDK" page still open in your browser.
Add faulty code
In order to test Sentry, we need to add code that’ll trigger an error when run in production. Over the next few steps, we’ll add code with different kinds of errors to see if Sentry is able to pick up each of them.
The first error we’ll introduce to our codebase is a wrong database password. We’ll then try to access our database with the wrong password and see if Sentry picks it up. Open the sentrydjango/settings.py file and scroll to the database configuration section and replace your password with any other string.
For the second test, we’ll add a zero division error to one of our application’s views. Open the sentrydjango/urls.py file and modify its contents so that it looks like the snippet below:
from django.contrib import admin
from django.urls import path, include

def trigger_error(request):
   division_by_zero = 1 / 0

urlpatterns = [
   path('admin/', admin.site.urls),
   path('app/', include('names.urls')),
   path('sentry-debug/', trigger_error),
]
Visiting the /sentry-debug route will call the trigger_error method, which will in turn trigger the zero division error.
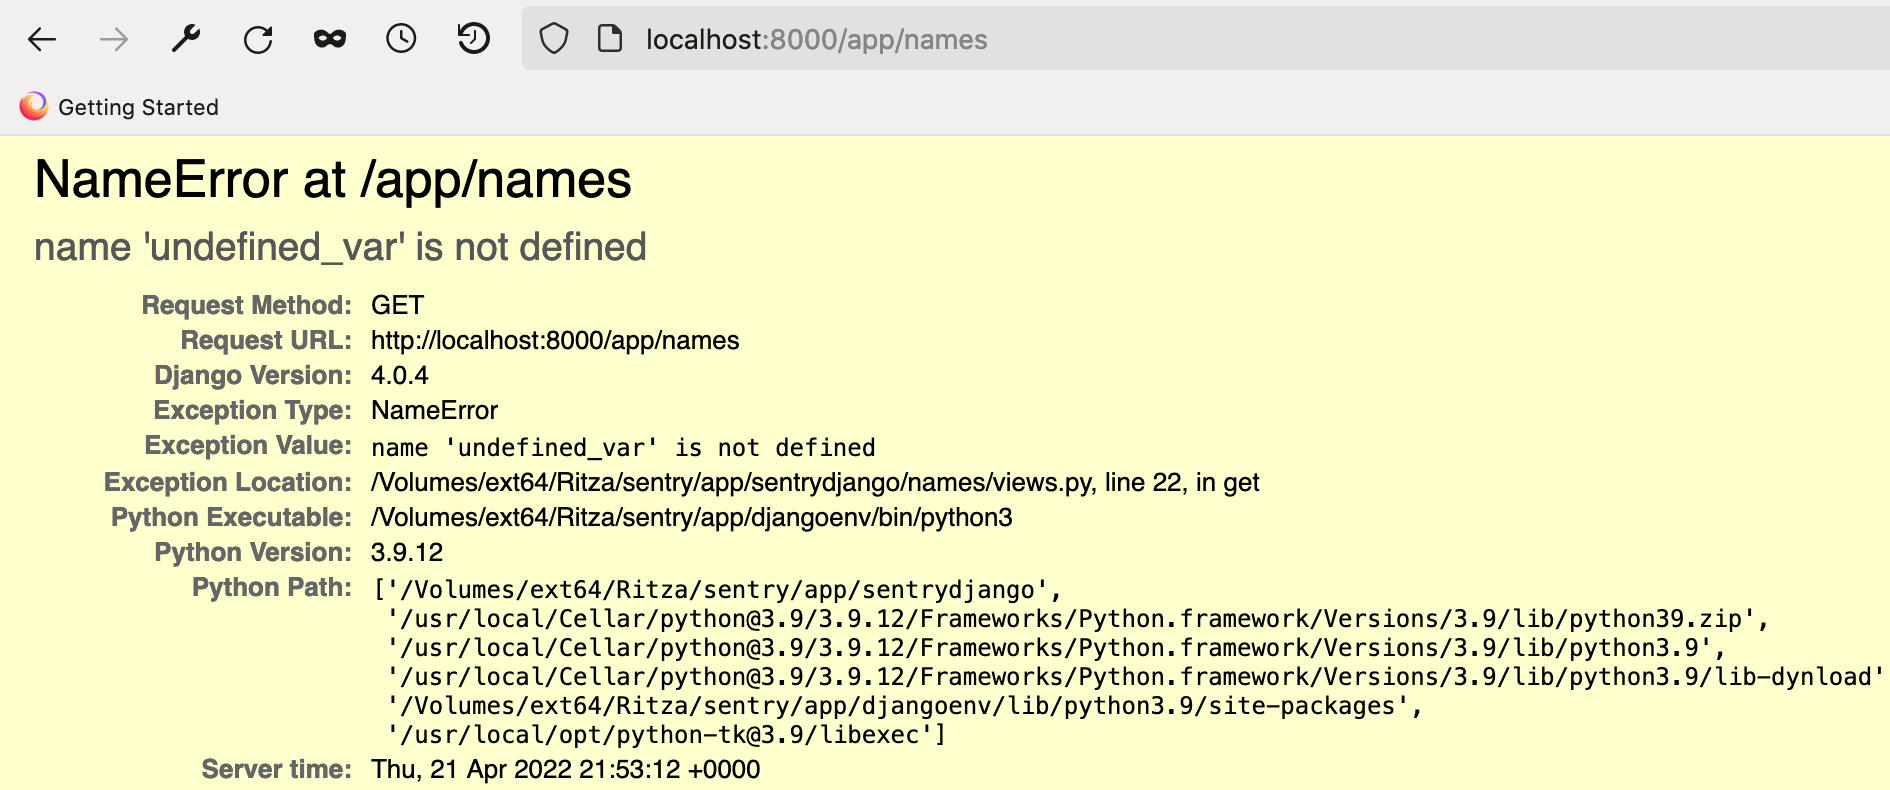
The last error we’ll test for is an “undefined” error. Open the names/views.py file and modify the get method to reference an undefined variable like so:
def get(self, request, id=None):
       #fetch all persons
       error = undefined_var
       persons = Person.objects.all()
       serializer = PersonSerializer(persons, many=True)
       return render(request, "names-list.html", context={"persons": serializer.data})
Test Sentry Integration
Before we test whether we added everything correctly, go to Sentry’s platform on the "Prepare the Django SDK" page and scroll to the bottom. Take note of the text at the bottom notifying you that Sentry is still waiting to detect an error from your code since you haven’t triggered any yet.

Test Case 1
Go to your terminal and start the Django application by running the command: python3 manage.py runserver. You should get an authentication error since you’re trying to access the database with the wrong credentials. Head back to your Sentry console on the "Prepare the Django SDK" page and you should find that the text at the bottom has changed to "Event was received!".
This confirms that we added Sentry correctly and that it’s working as expected.
Resolve Test Case 1
While on the "Prepare the Django SDK" page on Sentry, click on the "Take me to my error" button on the lower left of the page. This will take you to your "Issues" tab where you can find out more details about the error that occurred.
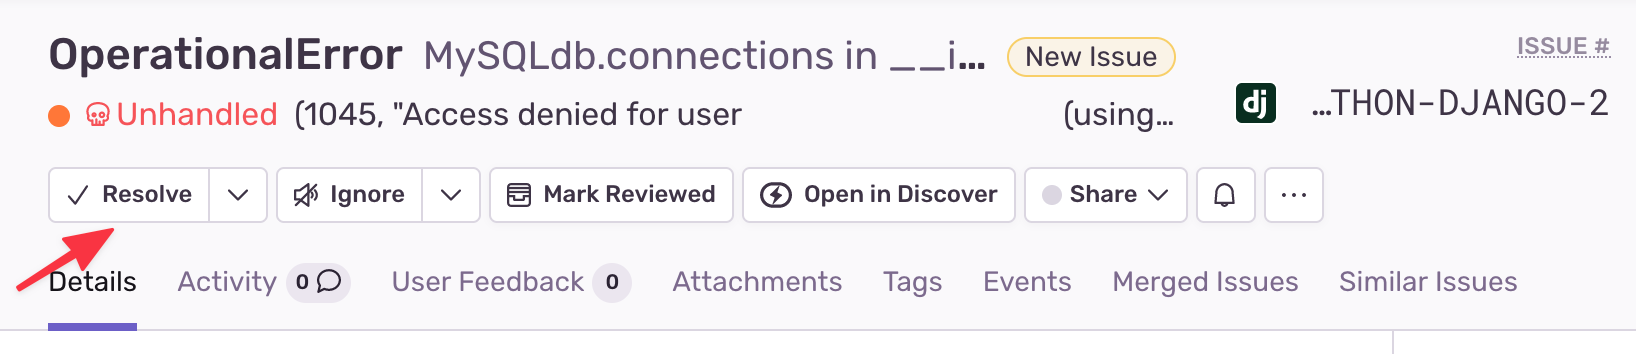
From the image above, we can see that Sentry was able to pick up the operational error and what it’s about, since the description says, "Access denied for user …". Let’s fix the error by changing the password back to its true value and then restarting the application. This time the application should start successfully.
If the restart went as expected, we can mark the error as resolved on Sentry’s "Issues" tab by clicking on the "Resolve" tag on the upper-left section of the page.
Test Case 2
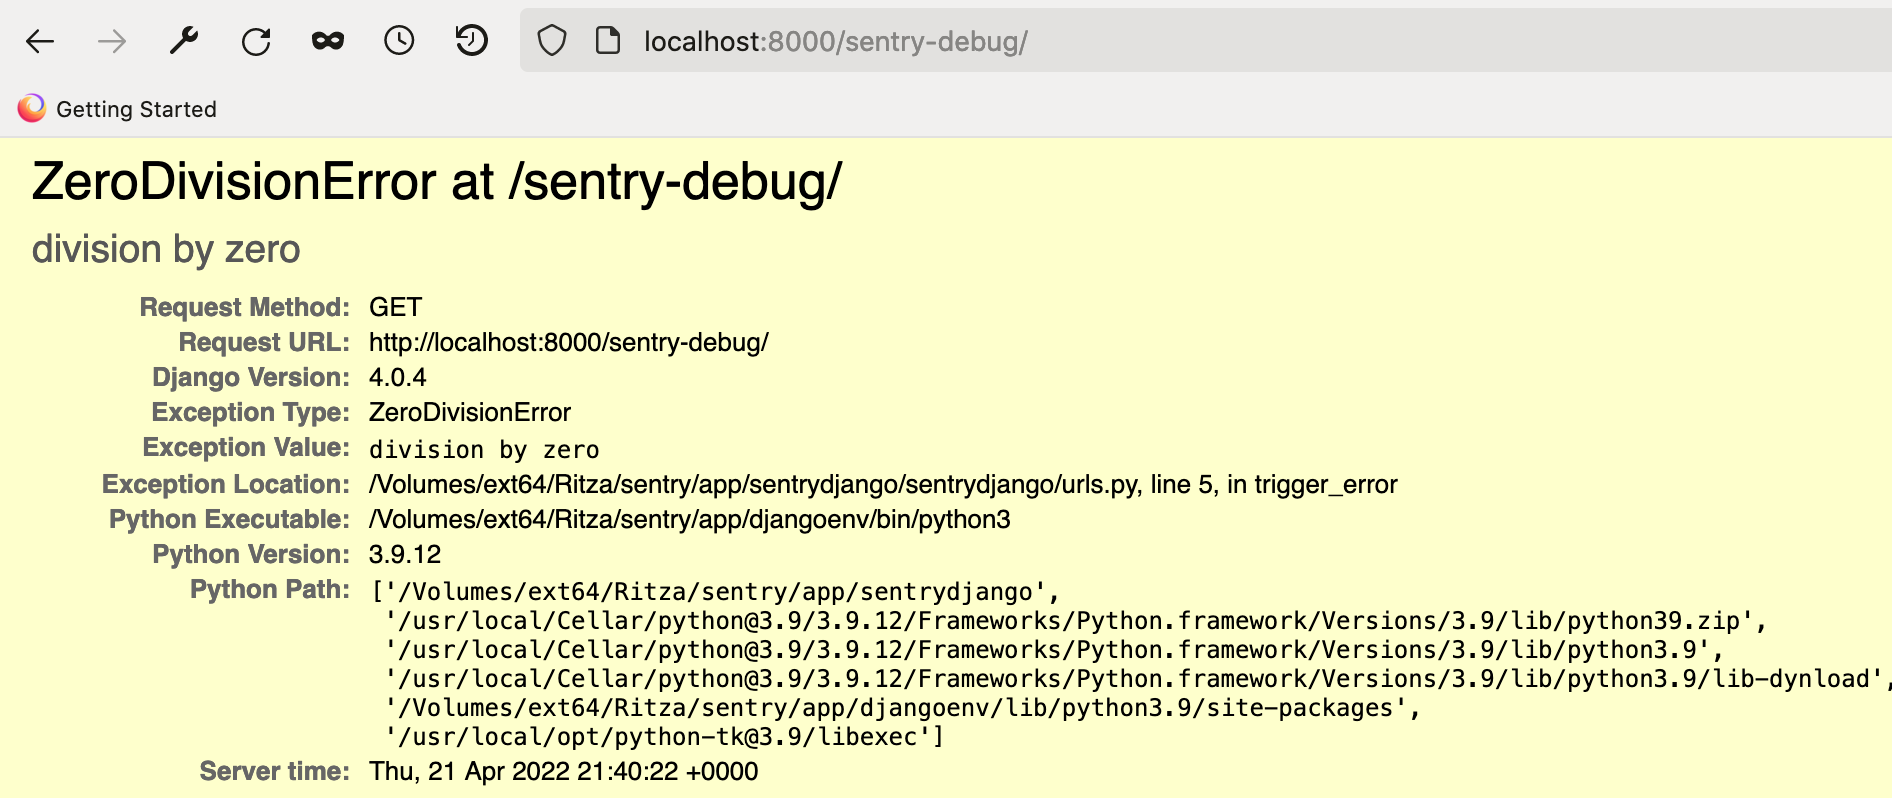
To demonstrate how Sentry handles zero division errors, visit the http://localhost:8000/sentry-debug route in your browser. There you should see the following error:
Resolve Test Case 2
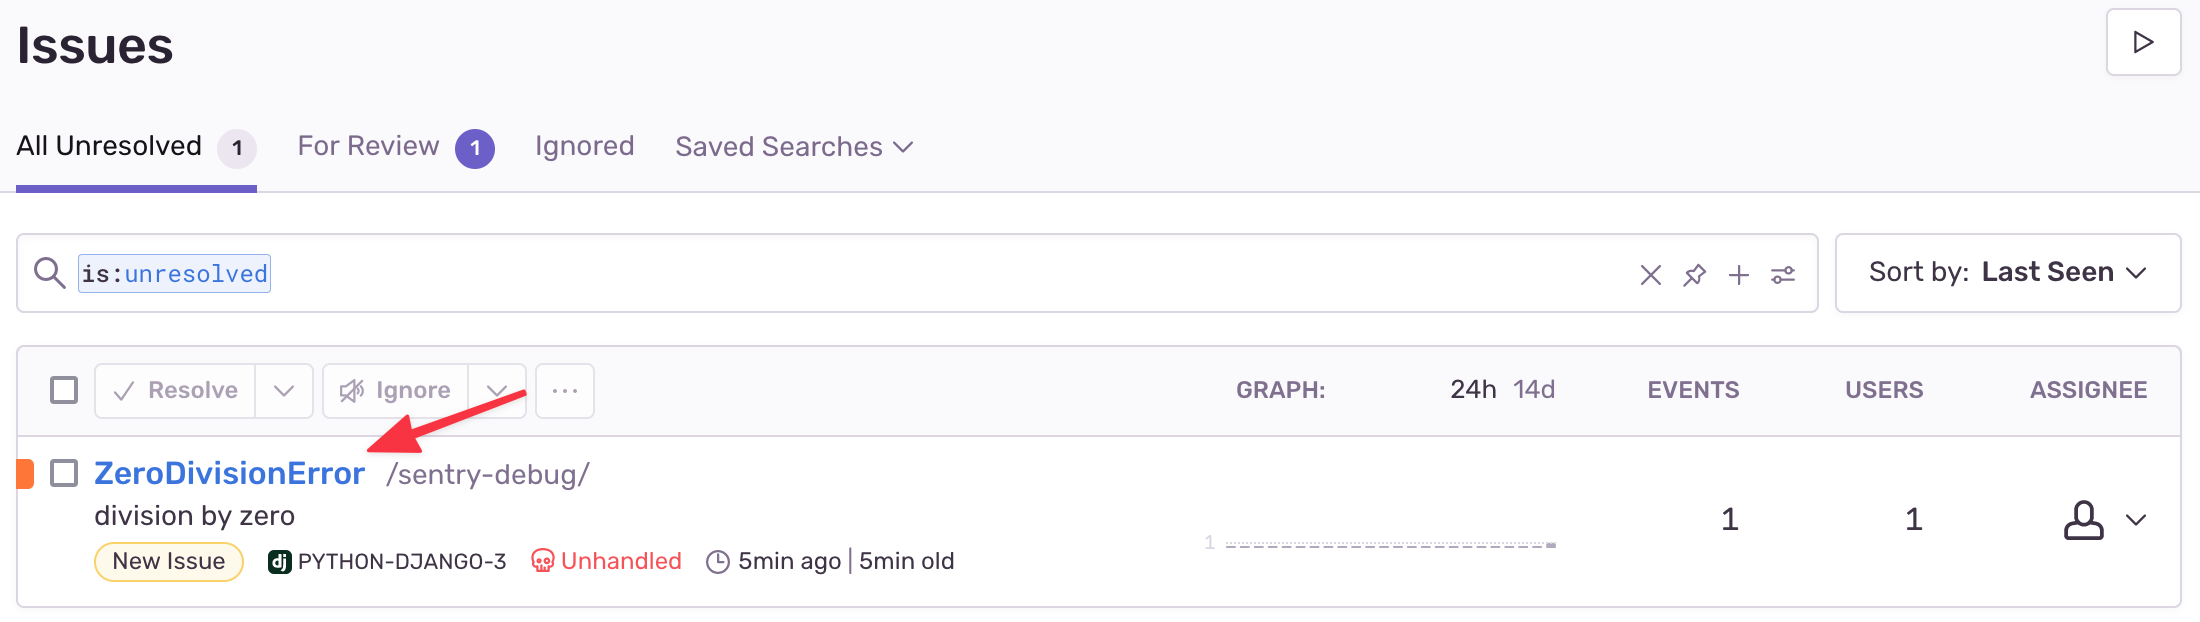
Return to your Sentry console and take a look at the error in your "Issues" tab. You'll notice the issue name is displayed in blue.
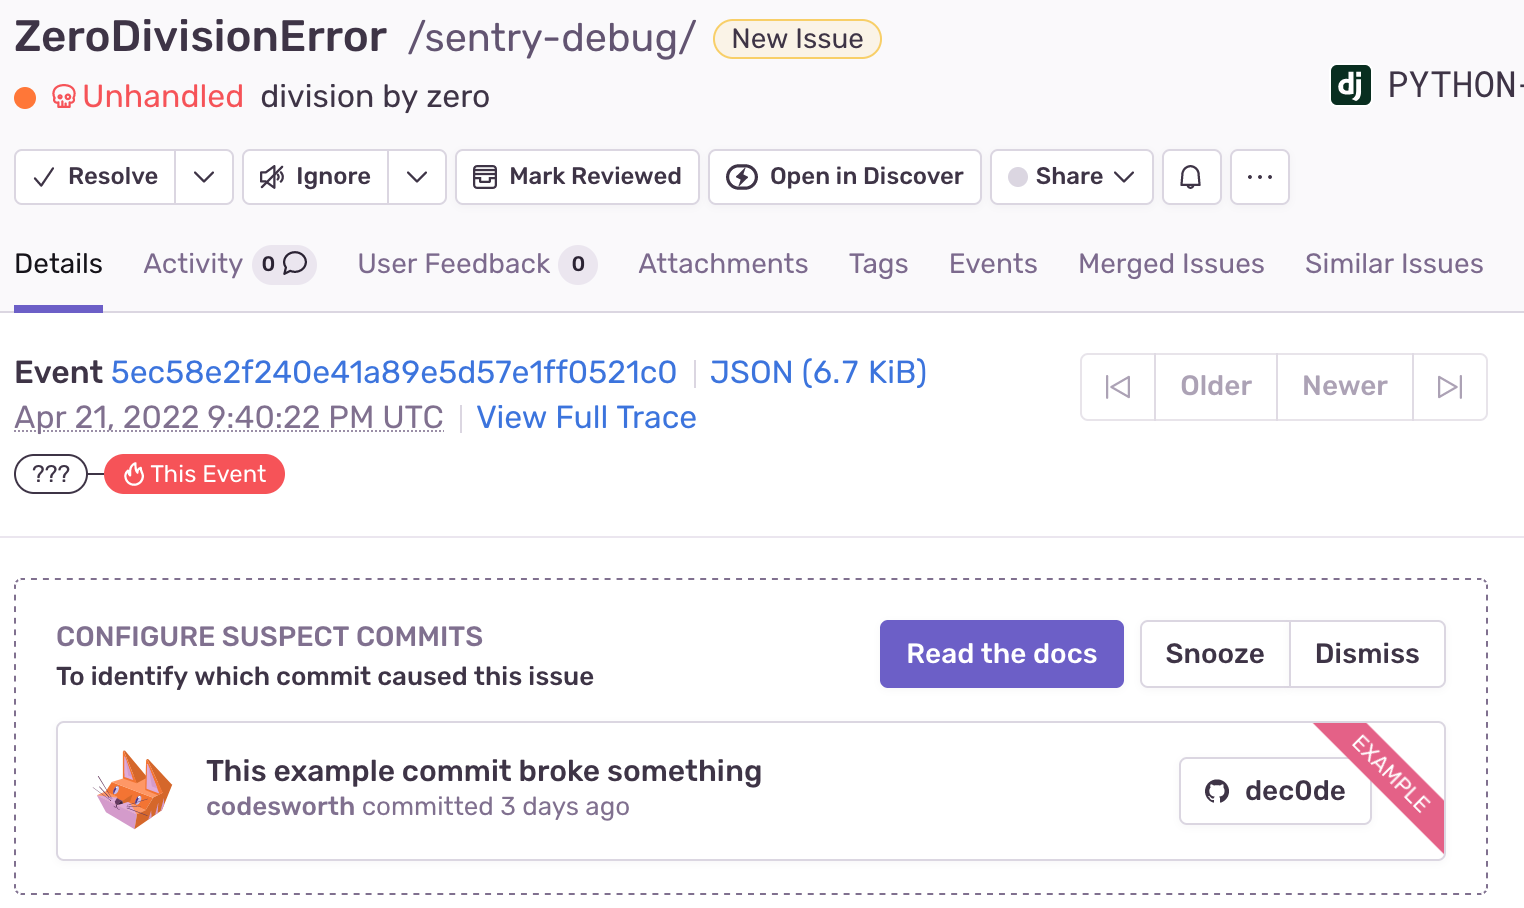
Click on the error name to get a detailed view of the error:
Let’s resolve the error by modifying the trigger_error method in urls.py to look like so:
from django.http import HttpResponse

def trigger_error(request):
   try:
       division_by_zero = 1 / 0
   except:
       division_by_zero = "Hello World"

   return HttpResponse(division_by_zero)
Save your changes and visit the http://localhost:8000/sentry-debug route in the browser. You should get a “Hello World” message. We can now mark the error as resolved on Sentry’s "Issues" tab.
Test Case 3
Navigate to the http://localhost:8000/app/names/ route of our application which will call the get method in our Person view. You should see the following error in your browser notifying you that there’s an undefined variable:
Resolve Test Case 3
Head over to the "Issues" tab on your Sentry console to check if the error was picked up.

Fix the error by removing the code that references the undefined variable in the get method. Visit the http://localhost:8000/app/names route again, and it should display successfully now.
You can resolve the error on Sentry.
Performance monitoring
Inconsistent application experiences aren't only due to errors or crashes. In addition to error monitoring, we need to monitor our application for slow responses and long page loads. Sentry's performance monitoring capabilities allow you to keep your application's performance healthy and optimized.
Let's take a look at how to add performance monitoring to our Django application, and then we'll analyze the reports in Sentry as before.
To enable performance monitoring, we only need to install Sentry's SDK and configure our trace sample rate. Both of these we have already done.
Navigate to your settings.py file and adjust your traces_sample_rate to 1.0 if it isn't already:
traces_sample_rate=1.0,This tells Sentry to capture 100% of the applications transactions for performance monitoring.
A Little Terminology
In Sentry, transactions are defined as calls that occur between our application's services or microservices. Transactions are composed of spans, which are the function calls and code executions within the application's services. Multiple transactions are seen as traces. Traces are a record of the entire operation, page load, or action being measured.
In the next two test cases, we'll modify code at the span level and see how the rest of the transaction and trace are affected. For the sake of brevity, we’ll focus on resolving Test Case 5, but the analysis and remedy is similar for Test Case 4.
Test Case 4
Let's simulate a slow page load, possibly due to a large resource.
Go to the urls.py in the sentrydjango folder and add the following function:
def large_resource(request):
   time.sleep(4)
   return HttpResponse("Done!")
This function will serve as a proxy for loading a large resource. Python's time.sleep() function suspends execution for a given number of seconds.
We need to import the time module, so add this code at the top of the file:
import timeNow add the function onto the application's routes. Your code should look like this:
urlpatterns = [
   path('admin/', admin.site.urls),
   path('app/', include('names.urls')),
   path('sentry-debug/', trigger_error),
   path('large_resource/', large_resource)
]
Visit http://localhost:8000/large_resource and it should display "Done!" after some time.
Test Case 5
For our final test case, we'll simulate poor-performing code by adding another time delay to the POST method.
Navigate to views.py in the names directory, and add the delay line to the POST function:
def post(self, request):
       serializer = PersonSerializer(data=request.data)
       # Poor performance code
       time.sleep(4)
       #check if data is valid then save else return error
       if serializer.is_valid():
           serializer.save()
           return render(request, "index.html", context={"message": "Save Successful"})
       else:
           return render(request, "index.html", context={"message": "Save Not Successful"})
Import the time module at the top of the file.
Visit http://localhost:8000/app and submit a name to trigger the post action.
You should notice the programmed delay in both the page load and action.
In the case that our delays aren't programmed, we need to figure out exactly where the slowdown is and how it's affecting our users.
Let's take a look at the Sentry dashboard to verify and analyze this.
Resolve Application Performance Errors
Navigate to the "Performance" tab on Sentry and you'll be greeted by a few graphs and tables. We'll keep our focus narrowed on the transactions table for this example.
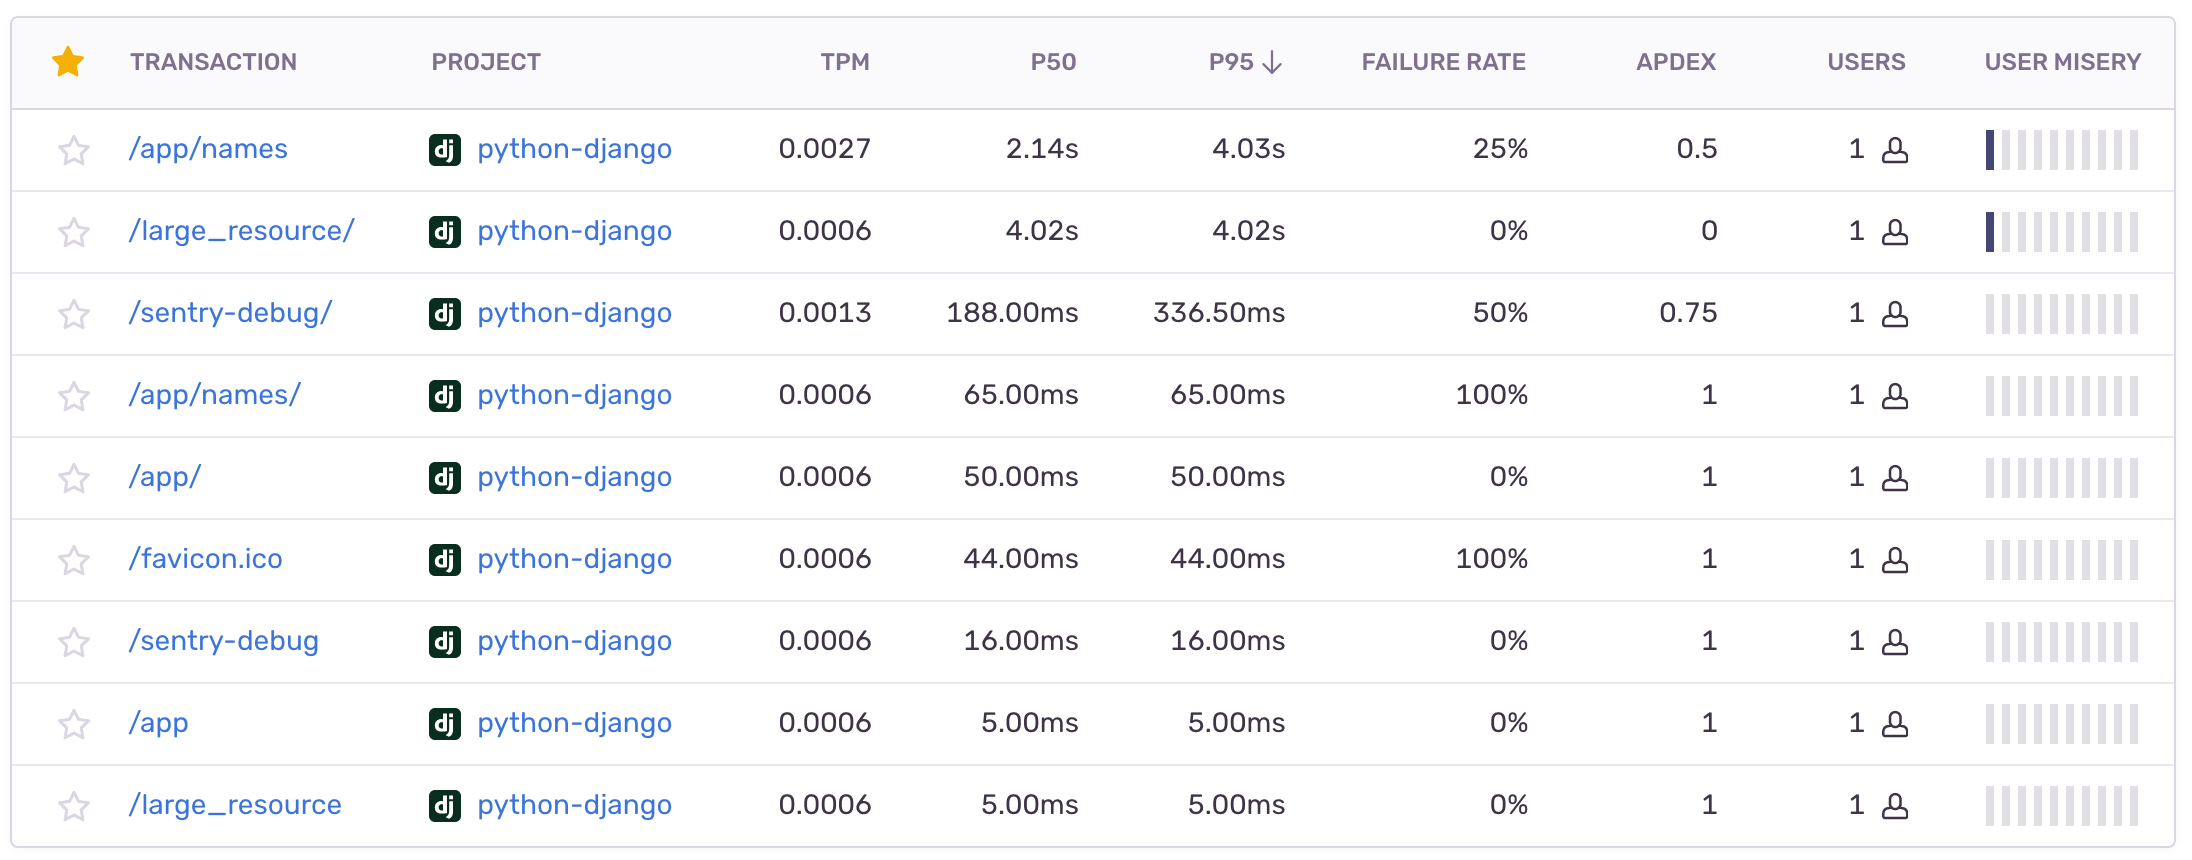
Sort the table using the P95 threshold column. This is the explanation from the Sentry docs:
The P95 Threshold indicates that 5% of transaction durations are greater than the threshold. For example, if the P95
threshold is 50 milliseconds, then 5% of transactions exceeded that threshold, taking longer than 50 milliseconds.
Transaction thresholds can be modified, but the current threshold is fine for our example.
The first row of the table has our POST request (yours might be a little different). Clicking on "/app/names" takes us to a summary view of the transaction with more breakdowns, maps, scores, and any related issues linked to the transaction.
From the supplied information, we can see that the transaction's total duration consists of individual spans, each with its own duration.
As expected, the time delay we’ve added is hurting our application’s performance, evident in the amount of time the transaction took to complete. This example demonstrates Sentry's ability to debug your application’s performance when it is in your users' hands.
Click on "names.views.PersonAPIViews" under "Suspect Spans" and you'll be given another view detailing the span's duration.
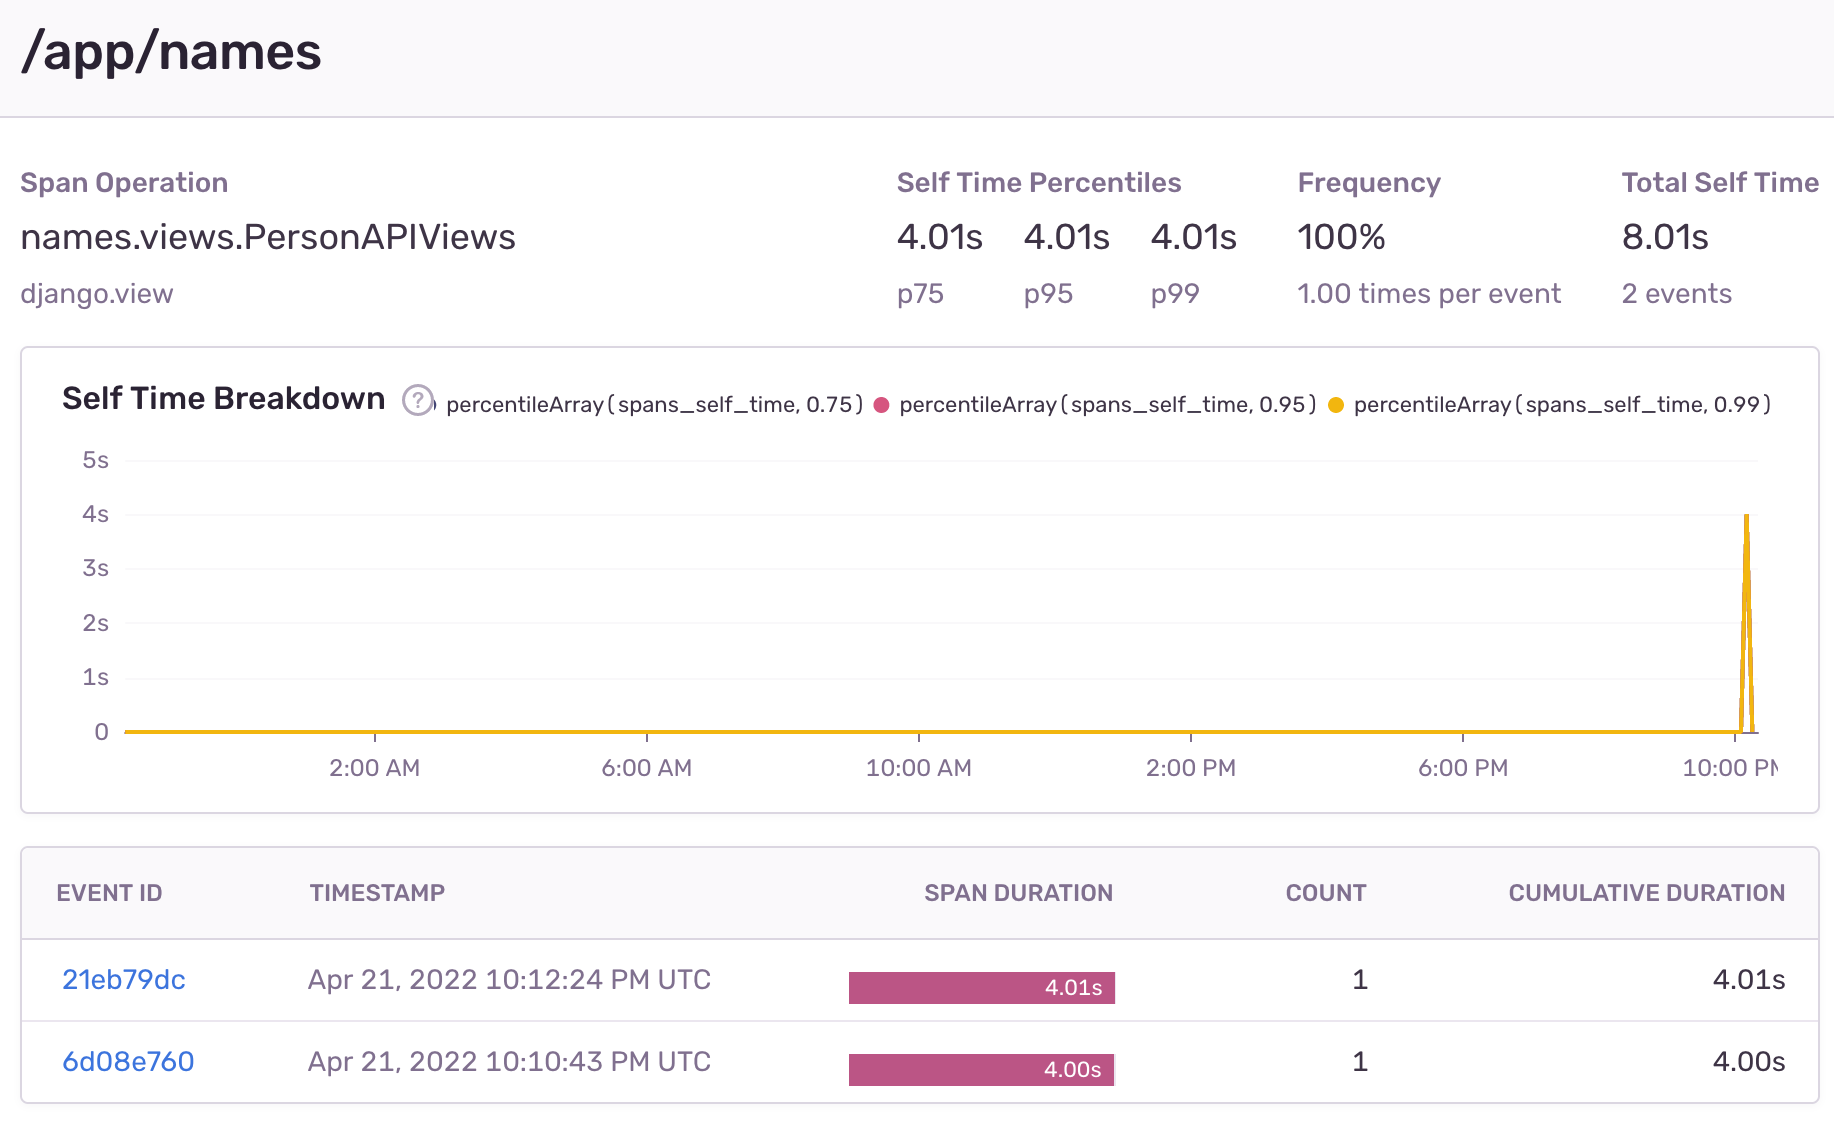
This specific span takes up 68% of our transaction due to the time delay we added to the POST method. The remainder of the duration is taken up by the database connection span, which may also be a point of required optimization.
We can fix the performance issue by removing the time delay in the code. If we trigger the POST action again, the span duration is reduced, and our application is back to being as performant as it could be.
We hope you find Sentry useful for Django error monitoring and if you do, you'll be glad to know it supports other popular tech stacks as well.


